Hi Everyone,
Welcome to the Club Scrap Dahlia Blog Hop & Linky Party. If you came from Anne Marie's Blog then you came from the right place. If you didn't then please start at the beginning at the Club Scrap Blog. The stunning Dahlia kit from Club Scrap is so bright and colorful. It is using happy colors of spring. Orange, fuschia & purple. If you haven't already grabbed this kit then go to Club Scrap Store before they are all gone.
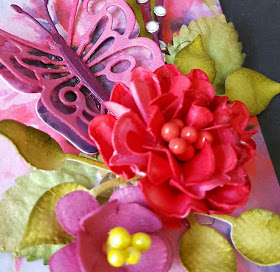
For my card I used the 12x12 patterned paper that has a floral border on top and bottom of the page. I cut the top border 5 3/4x5 3/4. With the remaining part I cut the remaining border. I attached both pieces on my 6x6 card to create the border on top and bottom of the card. I used the orange ribbon to hide the cut paper. I handmade three different types of flowers using the three colors orange, fuschia & purple. They are distress inked with some water beforehand. I used some leaves from I Am Roses. The flourish and tiny branch were created with the cardstock using the Elizabeth Craft Die. I jazzed up tiny branch with the Dahlia White Jewel Dazzles. Lastly I inked the corigated cardboard circle tag and added a sentiment using the cutapart sheet with a circle die.
Thanks for looking. Now head on over to Lisa's blog to continue the Blog Hop.
Pages
▼
Wednesday, April 27, 2016
Monday, April 25, 2016
April Challenge Blog Hop With Dahlia Kit By Club Scrap
Hi Everyone,
Welcome to the April Challenge Hop hosted by Club Scrap showcasing the gorgeous Dahlia kit. First things first. If you came from Lisa's Blog you came from the right place. If you didn't you can start at the beginning at the Club Scrap Blog.
This month's Challenge is handmade flowers and/or butterflies. This was right up my alley because I've been in a flower/butterfly frenzy. Trying out different techniques to create the most realistic flowers/butterflies. The following are different ways to create them. I hope you find them inspiring.
The 12x12 patterned paper from the Dahlia Kit matched perfectly with my photo. I knew I wanted this to be the focal point for my page. I used the ink splatter stamp from the Dahlia Club Stamp Kit and inked it with orange and purple. I used sections of the cutapart paper. For this page I used patterned paper to create my butterflies. The flowers are created with the plain white cardstock. I inked each one and used the embossing tools to shape the flowers. The flowers on the bottom are crumbled while wet and then opened to create a realistic flower. I added a few leaves here and there.
For this card I decided to use the flower on the patterned paper to create a unique flower. I used an exacto knife to cut sections of the petals and shaped them. I added some leaves once again with the white cardstock and inked it green. I used the twine that came with the kit. My butterflies were cut and inked to blend with the paper splatter color and I used metal wire to create the antennas. I used the colored cardstock to create a frame.
Here are some close ups of the flower
For my tag I used some scrap left over from the patterned paper and used the multi colored ribbon. The butterfly is a die from Elizabeth Craft Designs which has a plain outline and then a pattern. I layered the pieces for a dimentional butterfly. I added some handmade layered flowers and added some swirls. In the upcoming days I will be posting flower tutorials.
A close up of the flowers and butterfly
For my last card I made a one layer flower and used the felt button for my center and the yarn from the kit. I placed it on the ribbon and used one of the sentiment from the 12x12 pink paper. I used a scrap of the patterned paper and inked it with a stencil.
Thank you for stopping by. It's now time for you to head on over to Anne Marie's blog. Enjoy the rest of the blog hop.
Saturday, April 16, 2016
Dahlia kit from Club Scrap
Happy Saturday Everyone,
Today I want to share with you the Dahlia kit from Club Scrap. This is a stunning colorful kit to help us with the winter that just refuses to leave. Don't worry nicer weather is on the way for us folks that have harsher winters.
For my card I decided on the printed paper 8 1/2 x 11 for my base. I cut it so that I would have more negative space of the pattern on top with the floral print on the bottom. I matted with plain cardstock. I wanted the Oval scallop shape to blend in more with the pattern paper so I experimented with the Color Burst from Ken Oliver. Love the results. For my flowers I simply cut 3 flowers with the Bunch of Flowers 4 Die from Elizabeth Craft Designs. I created the stems with cotton wire and curled the tips at the top. Last I used the sentiment stamp from the Dahlia kit. Finished card is 4 1/4 x 5 1/2. TFL and have a wonderful weekend. Don't forget to head on over to Club Scrap to get this gorgeous kit and while you are there be sure to check out the blog for some more awesome inspiration from the Club Scrap Artists.
Sunday, April 10, 2016
Mojo Monday Card Sketch Challenge with Club Scrap Kit Dahlia
Happy Sunday Everyone,
I've been very busy this weekend. I am making projects with the Dahlia kit from Club Scrap. It is GORGEOUS!!! Its a truly beautiful kit with colors of purple, fuschia & orange. The patterned paper is made up with flowers using these colors. If you don't already have this stunning kit then be sure to get it before it is too late.
For my card I used the inspirational sketch #442 by Mojo Monday. The deadline is tonight at 8PM so if you want to participate you will have to hurry. I used the Dahlia 12x12 paper patterns and matted them with the purple 12x12 cardstock. I handmade the flower. I used some Elizabeth Craft Design & spellbinder dies and added a sentiment from the Dahlia kit. TFL and enjoy the rest of the weekend.
Friday, April 8, 2016
Elizabeth Craft Designs Guest DT
Hi Everyone,
Today I am super excited to be presenting as a Guest DT for Elizabeth Craft Designs. I use Elizabeth Craft Designs on my projects a lot so it is quite an honor to showcase my card on their blog. You can check out the post here.
When selecting which product I was going to use I instantly knew I had to create a card with the Garden Notes Grapevine Wreath Oval die. Here is my card.
8) Adhere the cut pieces of the Leavy Branch all around the Garden Notes Grapevine Wreath Oval.
9) Die cut Garden Notes Zinnia 2 times in your choice of color. (There is a fabulous video by Susan’s Garden Club on Youtube on how to assemble Garden Notes flowers.
10) Die cut Curvy Leaves in color of your choice to add some color.
11) Shape the cut leaves with Susan’s Garden Country Scapes Tools
12) Add a sentiment of your choice
This is a great card for any occasion. I hope this has inspired you. Thank you all for stopping by.
Elizabeth Craft Designs Product list
Through The Lens Wood Series
Garden Notes Grapevine Wreath Oval
Leafy Branch
Garden Notes Zinnia
Curvy Leaves
Susan’s Garden Club CountryScapes Tools
Other Product
Cardstock
Inks
Butterfly embellishment
Today I am super excited to be presenting as a Guest DT for Elizabeth Craft Designs. I use Elizabeth Craft Designs on my projects a lot so it is quite an honor to showcase my card on their blog. You can check out the post here.
When selecting which product I was going to use I instantly knew I had to create a card with the Garden Notes Grapevine Wreath Oval die. Here is my card.
6x6 folded card
Close Ups
Here are the instructions to recreate this card.
1) Cut a cardstock 6” x 12” and fold in half for your card base
2) Cut 1 sheet Through The Lens Woods Series 5 ¾” x 5 ¾”, distress the edges then adhere to center of card
3) Cut 1 sheet Through The Lens Woods Series 4 ¾” x 4 ¾”, distress the edges then adhere to center of card
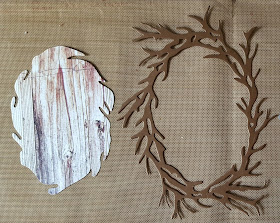
4) Die Cut 1 brown cardstock and 1 sheet of Through The Lens Wood Series with Garden Notes Grapevine Wreath Oval.
5) Adhere printed cut in the center with the brown cut around it.
6) Die cut Leavy Branch 5 times. I used white cardstock inked it green but you can use green. Cut them in half.
7) Shape the cut leaves with Susan’s Garden CountryScapes Tools
8) Adhere the cut pieces of the Leavy Branch all around the Garden Notes Grapevine Wreath Oval.
9) Die cut Garden Notes Zinnia 2 times in your choice of color. (There is a fabulous video by Susan’s Garden Club on Youtube on how to assemble Garden Notes flowers.
10) Die cut Curvy Leaves in color of your choice to add some color.
11) Shape the cut leaves with Susan’s Garden Country Scapes Tools
12) Add a sentiment of your choice
This is a great card for any occasion. I hope this has inspired you. Thank you all for stopping by.
Elizabeth Craft Designs Product list
Through The Lens Wood Series
Garden Notes Grapevine Wreath Oval
Leafy Branch
Garden Notes Zinnia
Curvy Leaves
Susan’s Garden Club CountryScapes Tools
Other Product
Cardstock
Inks
Butterfly embellishment
Friday, April 1, 2016
Little Blue Button Stamps New Release "Bells"
Hi Everyone,
It's time for another new release from Little Blue Button Stamps. When I received the image "Bells" I knew I had to watercolor it. I printed the image on Strathmore Watercolor paper and used distress inks on my acrylic block with a watercolor brush. I love the results. I wanted the bells to pop so I used perfect pearls. The papers are from My Mind's Eye 6x6 - A Beautiful life. I used the Stampin Up Embosslits Beautiful Wings Die For the butterflies. The ribbon is from the local Dollar Store. TFL and be sure to head on over to the Little Blue Buttons Stamp Blog to see what the rest of the team did.
It's time for another new release from Little Blue Button Stamps. When I received the image "Bells" I knew I had to watercolor it. I printed the image on Strathmore Watercolor paper and used distress inks on my acrylic block with a watercolor brush. I love the results. I wanted the bells to pop so I used perfect pearls. The papers are from My Mind's Eye 6x6 - A Beautiful life. I used the Stampin Up Embosslits Beautiful Wings Die For the butterflies. The ribbon is from the local Dollar Store. TFL and be sure to head on over to the Little Blue Buttons Stamp Blog to see what the rest of the team did.


