Sunday, November 24, 2019

Gold Embossed Pinecone Background With Brown Shading

Hi Everyone,
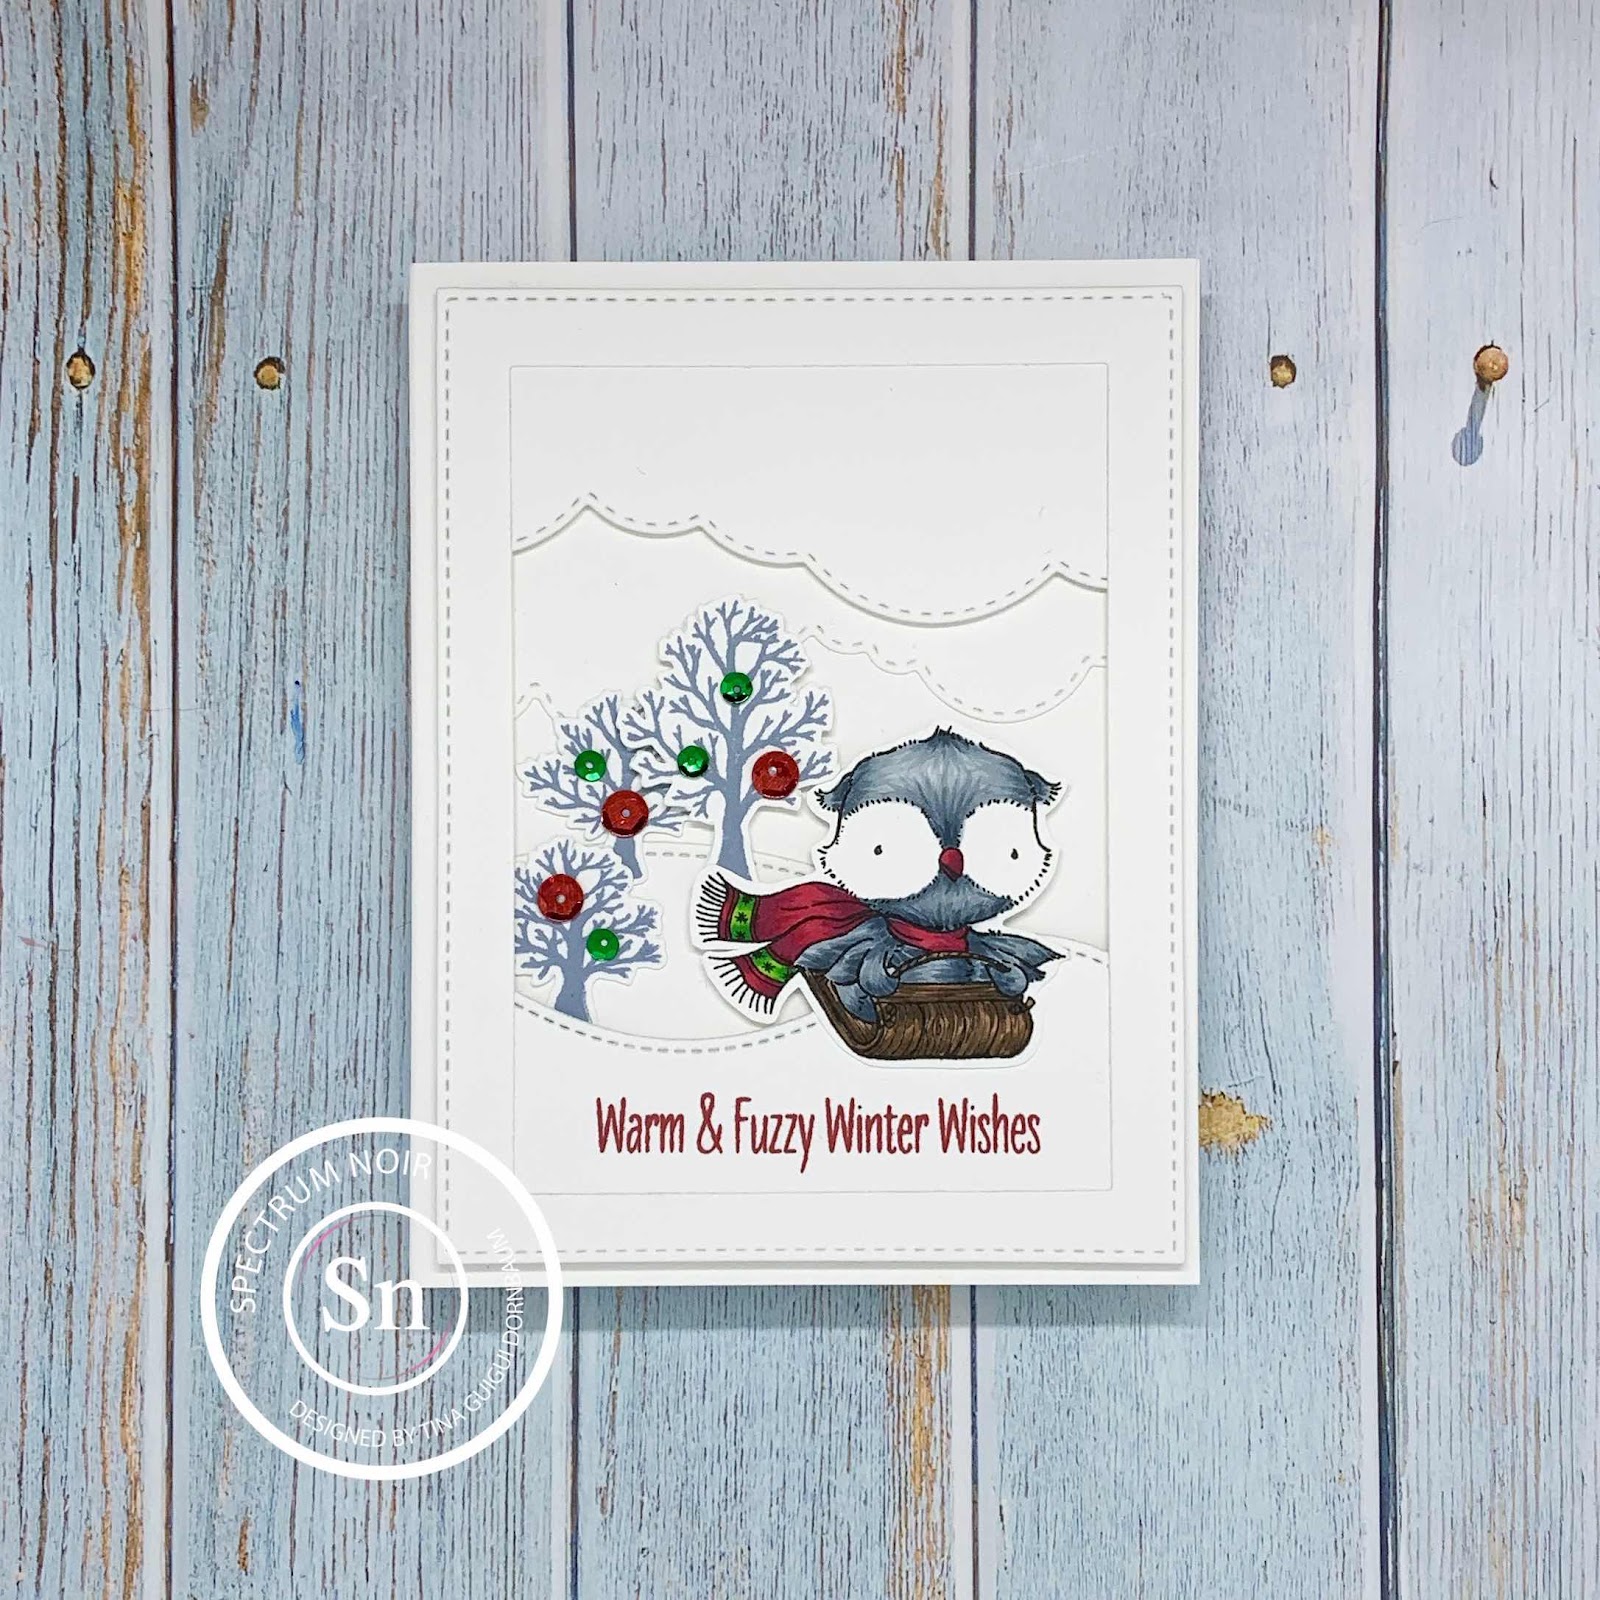
Today I am sharing a beautiful Pinecone Background Stamp from Simon Says Stamp. Although it is stunning stamped on it's own I decided to colour it with Brown Tones to bring the pinecones to life using Spectrum Noir Classique Markers. Below you will see the steps to create your own card.


Step 1 - Trim White Cardstock to 8 1/2" x 5 1/2", score at 4 1/4" and fold in half for a vertical side fold card. (A2)

Step 2 - Trim White Cardstock to 5 1/2" x 4 1/4". Stamp Pinecone Background using Versamark onto trimmed cardstock. Sprinkle Gold Embossing Powder and heat set it with a heat tool.

Step 3 - Colour in the pinecones using alcohol markers. I used Spectrum Noir Classique Markers EB6 and EB3. Please note to be super careful not to colour over the embossed areas as this might destroy your nibs. If you are worried then you can stamp using Gina K Amalgam Ink, colour and then go back and stamp using versamark and then heat emboss. You will need a stamp positioner tool for this method.

Step 4 - Trim Background created from Step 3 to 5 3/8" x 4 1/8". Trim Kraft Metallic to 5 1/2" x 4 1/4", adhere the metallic paper first, then the background using Nuvo Deluxe Adhesive.

Step 5 - Stamp Holiday Greetings Mix 1 using Versamark. Sprinkle White Embossing Powder and heat set it with a heat tool. You will need to your heat tool to be very hot and move the heat otherwise your metallic paper will start to crack. Trim the sentiment and create a fishtail using your scissors by cutting a center line and then snipping the end in an angle to the center line. Adhere to card using Foam Tape.

Step 6  For added interest and sparkle randomly adhere Gold Confetti using a Crystal Katana and collage medium.


This card can be used for several occasions by changing the sentiment and colours. I find this makes a beautiful holiday card. Right now Simon Says Stamp is offering free shipping for orders of $100 or more in the US, use code: SHPUSA and free shipping for orders of $200 or more for International Orders, use code: SHP2NT. Below you will find the links to all the products used. Thank you for stopping by and have a wonderful day.

Products Used:

Sunday, November 17, 2019

Quick And Easy Holiday Cards

Hi Everyone,
Can you believe the Holidays are around the corner?!? Today I have some quick and easy Holiday cards to share with you. I will show you some fast ways to mass produce quick and easy cards without losing quality. Simon Says Stamp's new Winter Floral Layering Stencil Set and the Concord & 9th Holly Berry Turnabout Stamp Set are fabulous for mass producing. Below you will find the easy steps to create your own cards.

Card #1

Card #1

Step 1 - Trim White Cardstock to 4 1/4" x 11", score at 5 1/2" and fold in half for a top folding card. (A2)

Step 2 - Place Winter Floral Layering Stencil directly on the card front and apply ink of your choice. There are 4 stencils. You can use a different color for each. I used Distress Oxide Inks in colours Candied Apple, Aged Mahogany, Mowed Lawn and Pine Needles. You can ink softly or heavy it's up to you. I went with a heavy hand for a bold design.

Step 3 - Stamp Holiday Greetings Mix 1 on White Cardstock using Ink of your choice. I used Distress Oxide Candied Apple. Trim to the length of the card (4 1/4") and a sliver from the sentiment. Adhere to card using Nuvo Deluxe Adhesive.

Step 4 - Trim Flourishing Green Mirror Cardstock into fine strips. About 1/8" x 4 1/4". Adhere to card above and below the sentiment using Nuvo Deluxe Adhesive. This will help to ground the sentiment.

Step 5 - Optional - Use gems, sequins or drops for added interest.

Card #2

Cards #2

Step 1 - Trim White Cardstock to 8 1/2" x 5 1/2", score at 4 1/4" and fold in half for a vertical side fold card. (A2)

Step 2 - Trim White Cardstock to 5 1/2" x 4 1/4". You will need a Stamping Tool and the Turnabout Jig for the next step.

Step 3 - Stamp Holly Berry onto the cardstock from Step 2. In order to align everything use the coordinating acetate from the Holly Berry Stamp Set and align it with the Turnabout Jig in your stamping tool. Place the stamp on top and close the lid of your stamping tool. For each stamped image you will need to rotate the jig with cardstock. I used temporary adhesive to adhere the cardstock to the jig. For the berries I used Distress Oxides Worn Lipstick, Abandoned Coral, Candied Apple and Barn Door. For the leaves I used Shabby Shutters, Bundled Sage, Mowed Lawn and Pine Needles. You can use one color for each turn or use one for all. It's your choice.

Step 4 - Diecut Notched Rectangles using the pattern created from Step 3. Optional - adhere Baker's Twine 3 times then adhere panel to card front using Nuvo Deluxe Adhesive.

Step 5 - Stamp Holiday Greetings Mix 1 sentiment onto coloured cardstock using Versamark. Sprinkle Gold embossing Powder and remove the excess. Heat set it with a heat Tool. If you don't have coloured cardstock you can ink with colour of your choice onto White Cardstock. I used Distress Oxide Mowed Lawn on White Cardstock. Let dry before heat embossing. 

Below are different angles and close ups.

Cards #1


Card #2


These cards were really fun to make and took little time. You can change it up by changing the colours and even use 2 colours instead of 4. You can even use non traditional colours. The choice is yours. Below is a link to all the products used. Thank you for stopping by and have a wonderful day!

Products Used:

Monday, November 4, 2019

Warm And Fuzzy Winter Wishes Card

Hi Everyone,
Today I am sharing one of my favorite stamp sets for Winter/Holiday cards. Warm & Feathered Hugs Stamp set from My Favorite Things. I wanted a card mostly in white with a hint of color. Below you will find the steps to create your own Winter Holiday Card.


Step 1 - Trim White Cardstock to 8 1/2" x 5 1/2", score at 4 1/4" and fold in half for a vertical side fold card. (A2)

Step 2 - Diecut Cloud Borders using White Cardstock. Adhere first layer using Nuvo Deluxe Adhesive and second layer using Foam Tape.

Step 3 - Diecut Stitched Hills using White Cardstock. Adhere first layer using Nuvo Deluxe Adhesive. Stamp Warm & Feathered Hugs sentiment using ink of your choice. Adhere the diecut to the card using Foam Tape.

Step 4 - Stamp Warm & Feathered Hugs image using Gina K Amalgam Ink. Colour in the image with medium of your choice. I used Spectrum Noir Illustrators. I coloured in the owl using a feathering technique. These markers are perfect for this technique because of the brush. Stamp the Warm & Feathered Hugs trees using a light grey ink and diecut with matching dies. Adhere to card using Nuvo Deluxe Adhesive for 2 and Foam Tape for the last one.

Step 5 - For added interest and sparkle apply Sequins on top of the trees using a Crystal Katana and Collage Medium.


This card makes me feel like the first snowfall when everything is white before people and cars make it all dirty. Below is a link to all the products used. To order the Illustrators go to Crafter's Companion here. All orders over $75 receives free shipping. Thank you for stopping by and have a wonderful day.

Products Used:

Friday, November 1, 2019

Coffee Lovers Blog Hop Fall Winter 2019

Hi Everyone,
Welcome to the Coffee Lovers Blog Hop for Fall/Winter 2019. Kat Scrappiness is a Super Sponsor. From November 1-8 there is a 15% off Sitewide (with some restrictions) use coupon code: COFFEE2019 at checkout. All orders over $50 will receive a free surprise. And finally there will be an Exclusive Prize Pack worth $50 for one lucky winner.


Be sure to head over to the Kat Scrappiness blog here.

For my card I used all products from Kat Scrappiness. I decided on a old vintage holiday look. Below you will find the steps to create your own Happy Holiday Coffee card.


Step 1 - Trim White Cardstock to 8 1/2" x 5 1/2", score at 4 1/4" and fold in half for a vertical side fold card. (A2)

Step 2 - Trim White Cardstock to 5 1/2" x 4 1/4". Apply Distress Oxide Ink Tumbled Glass to the entire panel using an ink applicator. Apply Distress Oxide Ink Shabby Shutters all around the edges about 1/2" - 3/4" in. Last apply Distress Oxide Ink Vintage Photo to the edge.

Step 3 - Diecut Crafters Essentials Winter Backdrop to the panel created in Step 2. Adhere to card front using Nuvo Deluxe Adhesive.

Step 4 - Diecut Layered Coffee Cup using coloured cardstock or ink sections in colours of your choice. Assemble the coffee then stamp a holiday sentiment using Versafine Onyx Black Ink under the cap. For added interest I attached bakers twine. Adhere to the card front using Nuvo Deluxe Adhesive.

Step 5 - Diecut Holly & Berries using coloured cardstock or ink sections in colours of your choice. Assemble the Holly & Berries and adhere to card using Foam Tape. For added interest I used Nuvo Crystal Drops to the berries and a shimmer pen to the holly.

Step 6 - Optional - Apply drops of Nuvo Jewel Drops randomly.


This card can be used for any occasion by changing the colours, themed diecut (Holly & Berries die) and sentiment. Below is a link to all the products used. Thank you for stopping by and have a wonderful day!

Products Used: