Tuesday, December 18, 2018

Elizabeth Craft Designs December Challenge Garden Notes Frame It

Hi Everyone,
Welcome back to the last Elizabeth Craft Designs Challenge for 2018. The DT challenge this month is to use the Garden Notes - Frame It Stitched nested dies on a card or project.

But before we start for a chance to win a $20 gift certificate answer this question here in the comments section. Which of the Garden Notes - Frame It Stitched Dieset would you use on a project and how would you use it?  Below you will find the steps to replicate this card.


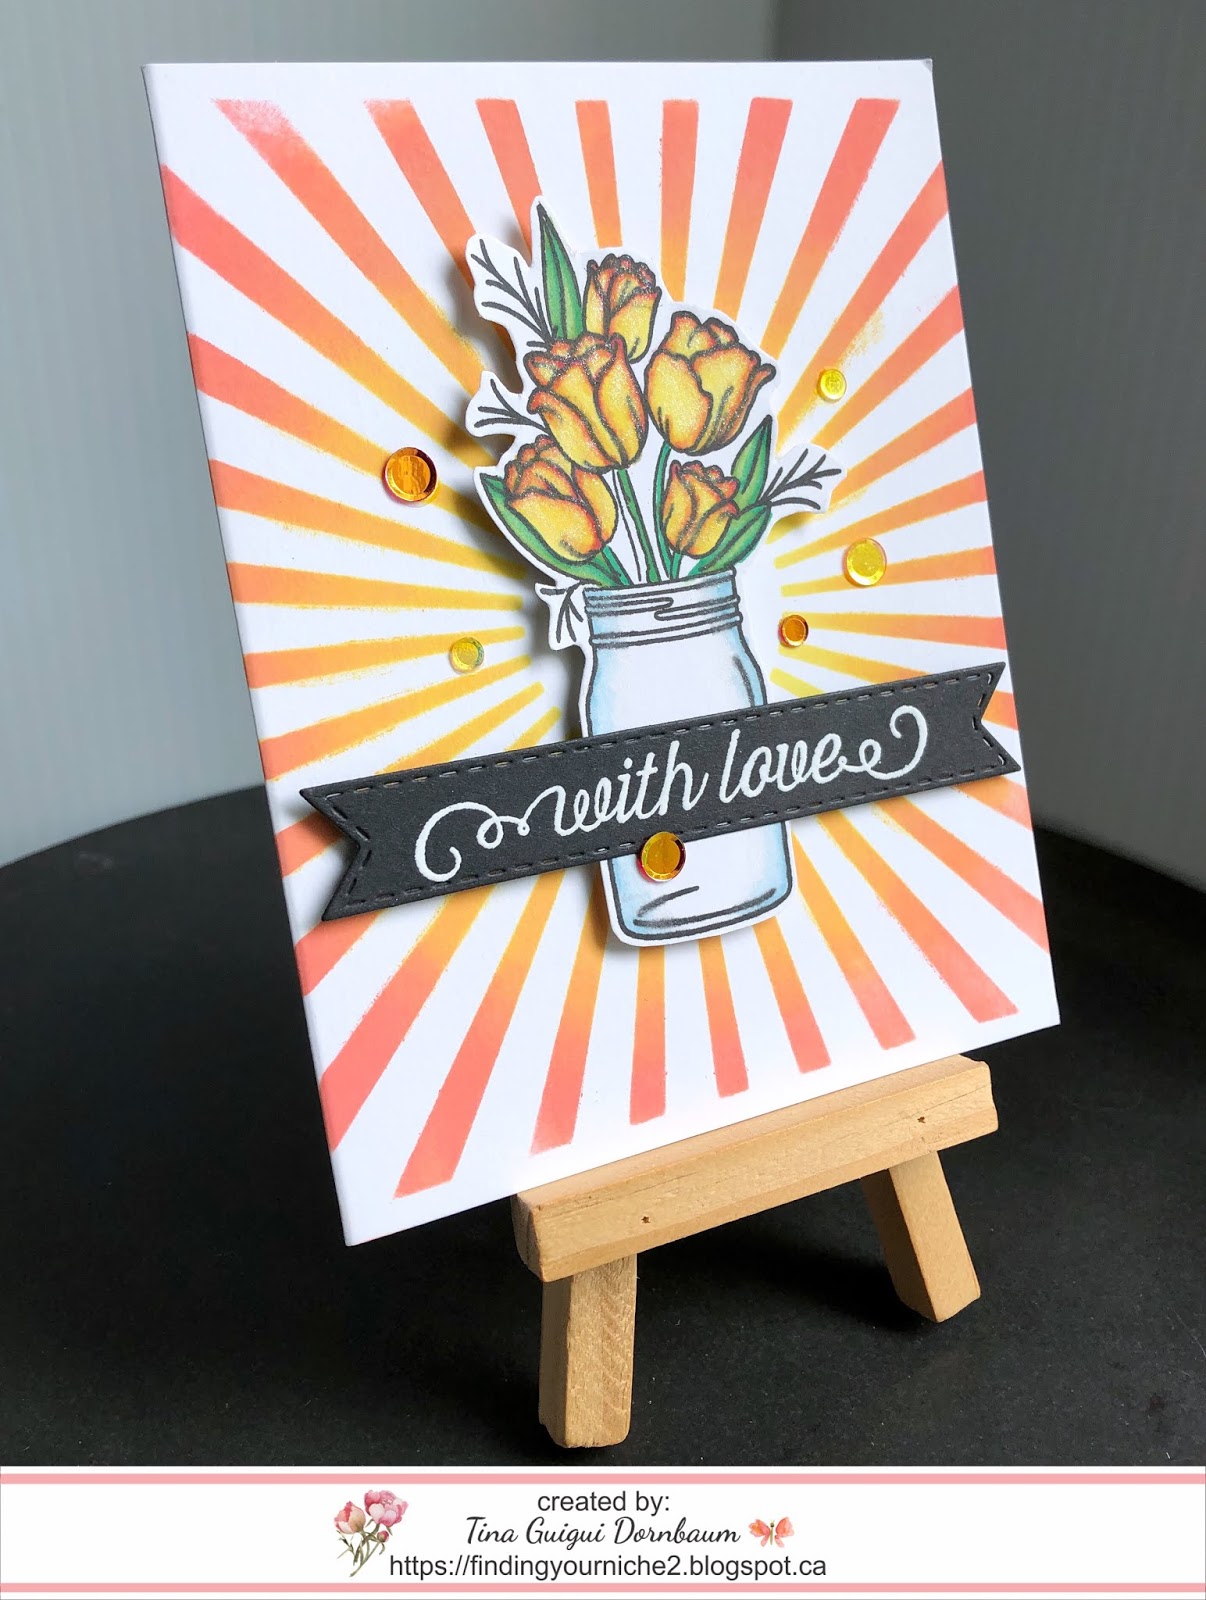
Step 1 - Trim White Soft Finish cardstock to 8 1/2" x 5 1/2", score at 4 1/4" and fold in half for a vertical side fold card. (A2)

Step 2 - Trim White Soft Finish cardstock to 4 1/4" x 5 1/2". Spray Distress Resist to the cardstock. Let dry. Apply Distress Oxide directly to cardstock using an ink applicator. I used Faded Jeans, Broken China and Cracked Pistachio.

Step 3 - Diecut Garden Notes Frame It Stitched Rectangles using the background created from Step 2. Adhere the outer diecut using foam tape and the inner using Kids Choice Glue.

Step 4 - Using an ink applicator color White Soft Finish Cardstock using Distress Oxide Ink Bundled Sage. Diecut Garden Notes Phalanopsis (Moth Orchid) using White Soft Finish Cardstock for the flowers and the Green created for the leaves and stem. Using PanPastel use the yellow/green color to highlight the flowers. Using a fine tip marker in order at dots to the center of the flower. Assemble the flowers, leaves and stem using Susan's Garden 4pcs all metal tool set and Kid's Choice Glue. Once assembled adhere to the inside frame using Kid's Choice Glue.

Step 5 - Stamp Love Sentiment using Versamark on black Cardstock. Sprinkle White Embossing Powder and heat set it with a heat tool. Trim the sentiment and adhere to card using 3mm Clear Double Sided Adhesive Tape.


I hope you enjoyed the last DT Challenge for 2018. This card can be used for any occasion by changing the colors, flowers and sentiment. Be sure to check out the Elizabeth Crafts Designs Blog to see what the rest of the Design Team created. Below is a link to all the products used. Thank you for stopping by and have a wonderful day! See you again in 2019 for the next DT Challenge.

Products Used:

Friday, December 7, 2018

Kat Scrappiness Blog Hop For Coffee Oasis

Hi Everyone,
Today is a special Blog Hop hosted by Kat Scrappiness to help The Coffee Oasis. It is an organization for the Homeless Youth. Kat Scrappiness will be donating 15% of all sales proceeds to Coffee Oasis. During the hop there will be 15% off everything in the store (use code: COFFEEOASIS at checkout). There will also be 4 gift packages each valued at $25 or more. There will also be a Hero Arts giveaway. On top of that there is a ton of sponsors and each will have their own prizes. The blog hop starts here.


Of course you can always donate directly to The Coffee Oasis by going here. You can donate $1, $5 or more, every bit counts. To learn more about The Coffee Oasis go here.

Card #1

Step 1 - Trim White Cardstock to 8 1/2" x 5 1/2", score at 4 1/4" and fold in half for a vertical side fold card (A2).

Step 2 - Create a Distress Oxide Background by applying Distress Oxide Stormy Sky and Tumbled Glass onto a craft mat. Spray with water and dip White Cardstock into the ink. Heat set and repeat until you reach the desired effect. For added interest mix White Acrylic Paint and water and spray on top of the background to create a snow effect. Let Dry.

Step 3 - Diecut Double Stitched Ovals using the Background created from Step 2. Adhere the outside diecut to the front of the card using foam tape. Diecut Tree Line Hill using the center diecut (you will use the top part and save the bottom part for the 2nd card. Diecut Tree Line Hill using White Cardstock. Adhere the Distress Top part and White bottom part to card using Nuvo Deluxe Adhesive Glue.

Step 4 - Diecut Snowflake Kisses sentiment using Glitter Cardstcok and White cardstock 2 times. Layer the diecut by adhering the 2 white diecuts and then the Glitter diecut on top using Collage Medium. Adhere to card using Collage Medium.

Step 5 - Optional - Diecut Snowflake Kisses snowflake multiple times using Glitter Cardstock. Adhere to card using Collage Medium.

Card #2

Step 1 - Trim White Cardstock to 8 1/2" x 5 1/2", score at 4 1/4" and fold in half for a vertical side fold card (A2).

Step 2 - Diecut Double Stitched Ovals using White Cardstock and Red Glitter Cardstock. Adhere the White outside Diecut to the front of card using Nuvo Deluxe Adhesive Glue. Diecut Tree Line Hill using the center part of the Red Glitter. Adhere the top Red Glitter to the card and the bottom Distress diecut left over from first card using Nuvo Deluxe Adhesive Glue.

Step 3 - Diecut Happy Holidays sentiment using Red Glitter Cardstock. Adhere to card using Collage Medium.

Step 4 - For added sparkle adhere Red Jewels using a Crystal Katana with collage medium.


Here is the link for the Blog Hop sign up.

Below is a link to all the products used. After the link you will find the links for the list of sponsors and giveaways. Thank you for joining the hop and have a wonderful day.

Products Used:

Here are a list of all the Sponsors and Giveaways.

Kat Scrappiness is offering 15% off EVERYTHING IN THE STORE and is donating 15% of all sales during this blog hop to Coffee Oasis! Use coupon code: COFFEEOASIS to save! We are also giving away gift packages!
Kat Scrappiness

Jessica Lynn Original is donating 8% of all sales during the blog hop to Coffee Oasis!
Jessica Lynn Stamps

PRIZE SPONSORS
The following sponsors have generously donated prizes to give away to our hoppers and visitors!
Blog Hop Sponsors  
Prizes being donated by our sponsors:

Friday, November 30, 2018

Fall Winter Coffee Lovers Blog Hop With Kat Scrappiness

Hi Everyone,
Welcome back to another Coffee Lover Blog Hop with Kat Scrappiness for Fall winter. Kat Scrappiness is a Super Sponsor and has a $25 Gift Card to shop at the store and a Gift Pack of KS products worth $35. There is also a 15% off coupon: COFFEE18 at checkout. Go here to the Kat Scrappiness Blog. To visit the store go here to katscrappiness.com.Today's card I wanted a winter feel to it so I went with the colors White and Black. Below you will find the steps to replicate this card.


Step 1 - Trim White Cardstock to 8 1/2" x 5 1/2", score at 4 1/4" and fold in half for a vertical side fold card. (A2)

Step 2 - Trim Black Cardstock to 4 3/8" x 5 5/8". Adhere to front of card using Nuvo Deluxe Adhesive Glue.

Step 3 - Trim Swiss Dot Petite Patterned Paper to 4 1/4" x 5 1/2". Diecut Stitched Scallop Oval using Swiss Dot Petite Patterned Paper. You will be using negative diecut. Diecut Double Stitched Rectangles using the negative diecut. Adhere to card using Nuvo Deluxe Adhesive Glue.

Step 4 - Diecut Layered Coffee Cup Build It (Swiss Dot Petite Patterned Paper for base and White Cardstock for all other pieces) Assemble using Collage Medium. Adhere to card on an angle using Nuvo Deluxe Adhesive Glue.

Step 5 - Diecut Fishtail Banners using Black Cardstock. Adhere to card using foam tape.

Step 6 - Diecut Got Coffee? using White Cardstock. Adhere to the top of the Fishtail Banner.


For a full listing go to the Kat Scrappiness Blog. Below is a link to all the Products Used. To receive 10$ off your order use code: TINA10 at checkout. Thank you for stopping by and have a wonderful day.

Products Used:

Tuesday, November 20, 2018

Elizabeth Craft Designs November Challenge A Floral Christmas

Hi Everyone,
Welcome back to another Elizabeth Craft Designs DT Challenge! This month's challenge is A Floral Christmas. Using flowers (ex. poinsettia) or foliage (ex. holly, pineboughs) to create Holiday Cards. Or even use something non traditional and make it Christmassy by using Christmas colors.

But before we start for a chance to win a $20 gift certificate answer this question here in the comments section. Which Elizabeth Craft Designs flower or foliage die or stamp set would you chose to create a Christmas Card or Decoration?  Below you will find the steps to replicate this card.


Step 1 - Trim White Soft Finish to 8 1/2" x 5 1/2", score at 4 1/4" and fold in half for a vertical side fold fold (A2)

Step 2 - Diecut Garden Notes Frame It Rectangles and Stitched Rectangles using White Soft Finish Cardstock to create a window.

Step 3 - Stamp Classic Christmas Sentiment to bottom of window created from Step 2 using Versamark. Sprinkle Gold Embossing Powder and heat set it with a heat tool. Adhere to card using foam tape.

Step 4 - On a scrap piece of White Soft Finish Cardstock apply Distress Oxide Inks Moved Lawn, Aged Mahogany and Walnut Stain.

Step 5 - Diecut Berry Spray with the Walnut Stain paper created from Step 4. Add Crystal Nuvo Drops Autumn Red to create the berries. Once completely dry adhere to the inside of the frame using Kid's Choice Glue.

Step 6 - Diecut Poinsettia with the Aged Mahogany paper and Moved Lawn paper created from Step 4 for the bottom layer of leaves. Assemble the pieces using Kid's Choice Glue. Add Prills to the center of Poinsettia. Once completely dry adhere to the inside bottom right using Kid's Choice Glue.


This card can be used for any occasion by changing the flower, sentiment and colors. Below is a link to all the products used. A reminder don't forget to answer the question in the comments section on the Elizabeth Craft Designs Blog for a chance to win at $20 Gift Certificate. Thanks for stopping by and have a wonderful day.

Products Used:

Tuesday, October 16, 2018

Elizabeth Craft Designs October Challenge A Very Krista Christmas

Hi Everyone,
It's time for the Elizabeth Craft Designs Challenge. This month it is featuring Krista Schneider's new release. Before we get started for a chance to win a $20 gift certificate go here and answer this question in the comments section. Which of the new Krista Schneider's stamp sets would you use to create a Christmas card? Below you will find the steps to replicate this card.


Step 1 - Trim White Soft Finish Cardstock to 8 1/2" x 5 1/2", score at 4 1/4" and fold in half for a vertical side fold card.

Step 2 - Trim White Soft Finish Cardstock to 5 1/2" x 4 1/4". Apply Distress Oxide Ink using an ink applicator Moved Lawn and Barn Door. Spritz some water to create droplets. Use a heat tool to thoroughly dry the cardstock. See below photo for visual.


Step 3 - Stamp Snowflakes using Versamark. I used various snowflake sizes. Sprinkle Gold Embossing Powder, remove the excess and heat set it with a heat tool.

Step 4 - Dry Emboss Stitched Rectangles to the Do It Yourself Background. Adhere to card using Kid's Choice Glue. 

Step 5 - Stamp Classic Christmas sentiment using Versafine Onyx Black Ink.

Step 6 - Stamp Elves onto White Soft Finish Cardstock using Versafine Onyx Black Ink. Color image using any color medium. I used Winsor and Newton Promarkers. Diecut with matching die. Adhere to card using foam tape.

Step 7 - For added interest and sparkle randomly adhere Red Jewels.


This card can be used for any occasion by changing the colors, image and sentiment. Below is a link to all the products used. Thank you for stopping by and have a wonderful day. Don't forget to answer the question on the Elizabeth Craft Designs for a chance to win a $20 gift certificate.

Products Used:

Sunday, September 30, 2018

Santa is Watching Shaker Card

Hi Everyone, 
I have a process video to share with you for a Holiday Shaker Card. This card is showcasing the fun Stitched Scallop Collage Die, the Never Ending Rectangles Die, Sparkling Clear Solid Confetti Mix and the Photoplay Here Comes Santa from Kat Scrappiness. You can view the video below or open it in YouTube.


Below is a link to all the products used. To receive 10% off your order at Kat Scrappiness used code: TINA10 at checkout. Thanks for stopping by and have a wonderful day!

Products Used:

Saturday, September 29, 2018

National Coffee Day Blog Hop September 2018 With Kat Scrappiness

Hi Everyone, today it's National Coffee Day Blog Hop! Kat Scrappiness is a Super Sponsor so hop along with us at Kat Scrappiness Blog and you can win one of two $25 Gift Cards to shop at katscrappiness.com.


Below you will find the steps to replicate this card.


Step 1 - Trim Ivory Cardstock 8 1/2" x 5 1/2", score at 4 1/4" and fold in half for a vertical side fold card. (A2)

Step 2 - Place Honeybee Coffee Lovers Background (Coffee Rings) to the lower half of the front card and ink with Distress Oxide Walnut Stain. Spray some water and dab it to create more realistic stains.

Step 3 - Diecut Got Coffee base using Sand cardstock, the lid in brown and the coffee warmer in ivory. Stamp Lets Get Caffeinated sentiment stamp to the bottom of the coffee cup solid piece. Assemble the Coffee using collage medium. Before adhering the coffee warmer apply baker's twine 3 times and tie in a bow. Adhere the coffee to the front of card using scor tape.

Step 4 - Stamp Lets Get Caffeinated the coffee beans above the coffee to look like steam. 


I hope you have enjoyed this card. Remember to go here for a chance to win a $25 gift certificate. To receive 10% off your order use code TINA10 at checkout. Below are links to all the products used. Thank you for stopping by and have s wonderful day. 

Products Used:

Tuesday, September 18, 2018

Elizabeth Crafts Designs September Challenge Classic Christmas

Hi Everyone,
Today is the Challenge for Elizabeth Craft Designs. The challenge this month is Classic Christmas. Things that make traditions such as snowflakes, Christmas trees, roasting marshmellows, etc. There is a wonderful assortment from the new release by Joset Designs to help you with Holiday/Christmas classics. I used the gorgeous Snowflake Border die.

Before we get started for a chance to win a $20 gift certificate answer this question. What Elizabeth Craft Designs die or stamp set would you select if making a Christmas card? Go here to answer the question in the comments section. Below you will find the steps to replicate this card.


Step 1 - Trim Kraft Cardstock to 8 1/2" x 5 1/2", score at 4 1/4" and fold in half for a horizontal side fold card. (A2)

Step 2 - Trim ModaScrap Christmas Holidays Patterned Paper to 4 1/4" x 5 1/2" and adhere to front of card using 3mm Clear Double Sided Adhesive Tape.

Step 3 - On the card front from the bottom add 1 1/2" of Clear Double Sided Adhesive Tape. Diecut Snowflake Border solid die to the bottom front of card. Carefully remove the release sheet and sprinkle Silk Microfine Glitter Rose Gold. Remove excess with a brush and carefully using your fingertip in a circular motion to bring out the shine and set the glitter.

Step 4 - Trim ModaScrap Christmas Holidays Patterned Paper to 2 1/4" x 5 1/2". Diecut Snowflake Border pattern die to the bottom of the trimmed paper. Adhere to the bottom front of card carefully aligning the bottom edges using Kids Choice Glue around the bottom part and 3mm Clear Double Sided adhesive Tape to the upper top and sides.

Step 5 - Stamp Classic Christmas Sentiments Clear Stamp to the top left side of the bottom paper using Distress Oxide Ink Walnut Stain (or any ink medium of your choice).


You can use the diecut pieces to use inside your card or keep them for a shaker card. Below is a link to all the products used. Thanks for stopping by and have a wonderful day!

Products Used:

Thursday, August 23, 2018

Two Backgrounds Using One Stencil Plus A Blog Giveaway

Hi Everyone,
I have two cards to share with you using My Favorite Things Stencil Radiating Rays. Distress Oxide Inks are great for creating a second imprint from one inking. After I inked my first cardstock I used the Distress Sprayer and sprayed the stencil with water. While wet I placed it on a second cardstock. Below are the results.

Before we get started I have a Blog Giveaway. The winner will win the fabulous 3-D Texture Fades Botanical Embossing Folder. All you have to do is Follow My Blog and Subscribe to my YouTube Channel. The contest will run until September 15. The winner will be randomly selected and announced September 16.


  • Step 1 - Trim White Cardstock to 8 1/2” x 5 1/2”, score at 4 1/4” and fold in half for a vertical side fold card (A2).
  • Step 2 - Place Radiating Rays Stencil on front card base using Painters Tape. Starting at the middle apply Distress Oxide Ink Squeezed Lemonade using an ink applicator. Follow by Wild Honey and end with Abandoned Coral. Carefully remove the stencil. Now spray the stencil with water and place it on a 4 1/4” x 5 1/2” white cardstock. Press gently and remove the stencil. You now have a background for a second card. Put it aside to dry. 
  • Step 3 - Stamp Mandy’s Flowers using Versafine Onyx Black Ink. Color in the flowers using any Color medium of your choice. I used Winsor and Newton Promarkers which are alcohol based for easy blending. Adhere to card using Foam Tape. 
  • Step 4 - Stamp Mandy’s Flowers sentiment using Versamark Ink on Black Cardstock. Sprinkle White embossing powder and heat set with a heat tool. Diecut Stitched Fishtail Banners with the sentiment. Adhere to card using Foam Tape at the ends and Clear Double Sided Adhesive Tape in the center. 
  • Step 5 - Using the Crystal Katana place sequins randomly and adhere with Collage Medium. 
  • Step 6 - Optional - Add some shimmer to the flowers using Nuvo Shimmer Pen. 
  • Step 1 - Trim White Cardstock to 8 1/2” x 5 1/2”, score at 4 1/4” and fold in half for a vertical side fold card (A2).
  • Step 2 - Diecut Double Stitched Rectangles using the background created from the first card. Adhere to card front using Clear Double Sided Adhesive Tape. 
  • Step 3 - Stamp Thoughtful Messages sentiment to bottom of the background using Versafine Onyx Black Ink. 
  • Step 4 - Stamp Spring Flowers using Versafine Onyx Black Ink. Color in the flowers using any Color medium of your choice. I used Distress Oxide Inks with a Waterbrush. I used Squeezed Lemonade, Wild Honey, Abandoned Coral. Diecut Spring Flowers to making images. Adhere to card using Foam Tape. 
  • Step 5 - Using the Crystal Katana place prepared Crystal Nuvo Drops Morning Dew randomly and adhere with Collage Medium. 


These cards can be used for any occasion by changing the images, colors and/or sentiments. Below is a link to all Products Used. 

To receive 5$ off your order at Simon Says Stamp use code: SVE954 at checkout.

To receive 10% off your order at Kat Scrappiness use code: TINA10 at checkout.

Thank you for stopping by and have a wonderful day.

Products Used: