
Today is a special Blog Hop hosted by Kat Scrappiness to help The Coffee Oasis. It is an organization for the Homeless Youth. Kat Scrappiness will be donating 15% of all sales proceeds to Coffee Oasis. During the hop there will be 15% off everything in the store (use code: COFFEEOASIS at checkout). There will also be 4 gift packages each valued at $25 or more. There will also be a Hero Arts giveaway. On top of that there is a ton of sponsors and each will have their own prizes. The blog hop starts here.

Of course you can always donate directly to The Coffee Oasis by going here. You can donate $1, $5 or more, every bit counts. To learn more about The Coffee Oasis go here.

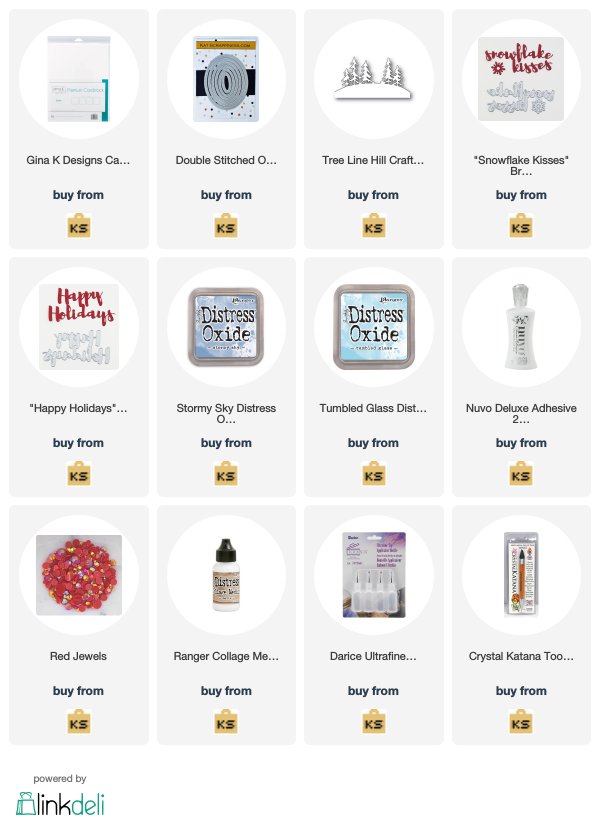
Card #1

Step 1 - Trim White Cardstock to 8 1/2" x 5 1/2", score at 4 1/4" and fold in half for a vertical side fold card (A2).
Step 2 - Create a Distress Oxide Background by applying Distress Oxide Stormy Sky and Tumbled Glass onto a craft mat. Spray with water and dip White Cardstock into the ink. Heat set and repeat until you reach the desired effect. For added interest mix White Acrylic Paint and water and spray on top of the background to create a snow effect. Let Dry.
Step 3 - Diecut Double Stitched Ovals using the Background created from Step 2. Adhere the outside diecut to the front of the card using foam tape. Diecut Tree Line Hill using the center diecut (you will use the top part and save the bottom part for the 2nd card. Diecut Tree Line Hill using White Cardstock. Adhere the Distress Top part and White bottom part to card using Nuvo Deluxe Adhesive Glue.
Step 4 - Diecut Snowflake Kisses sentiment using Glitter Cardstcok and White cardstock 2 times. Layer the diecut by adhering the 2 white diecuts and then the Glitter diecut on top using Collage Medium. Adhere to card using Collage Medium.
Step 5 - Optional - Diecut Snowflake Kisses snowflake multiple times using Glitter Cardstock. Adhere to card using Collage Medium.
Card #2

Step 1 - Trim White Cardstock to 8 1/2" x 5 1/2", score at 4 1/4" and fold in half for a vertical side fold card (A2).
Step 2 - Diecut Double Stitched Ovals using White Cardstock and Red Glitter Cardstock. Adhere the White outside Diecut to the front of card using Nuvo Deluxe Adhesive Glue. Diecut Tree Line Hill using the center part of the Red Glitter. Adhere the top Red Glitter to the card and the bottom Distress diecut left over from first card using Nuvo Deluxe Adhesive Glue.
Step 3 - Diecut Happy Holidays sentiment using Red Glitter Cardstock. Adhere to card using Collage Medium.
Step 4 - For added sparkle adhere Red Jewels using a Crystal Katana with collage medium.


Here is the link for the Blog Hop sign up.
Below is a link to all the products used. After the link you will find the links for the list of sponsors and giveaways. Thank you for joining the hop and have a wonderful day.
Here are a list of all the Sponsors and Giveaways.
Kat Scrappiness is offering 15% off EVERYTHING IN THE STORE and is donating 15% of all sales during this blog hop to Coffee Oasis! Use coupon code: COFFEEOASIS to save! We are also giving away gift packages!
Jessica Lynn Original is donating 8% of all sales during the blog hop to Coffee Oasis!
PRIZE SPONSORS
The following sponsors have generously donated prizes to give away to our hoppers and visitors!
- A Jillian Vance Design - $25.00 Gift Card
- Art Impressions - Latte Love Stamp Set
- Avery Elle - One Holiday Glass stamp set and one Punny Pantry stamp set
- Brutus Monroe - $25.00 Gift Card
- Cathy Zielske - Free class of winner's choice
- Concord & 9th - $50.00 Gift Card
- Doodles Paper Playground - (1) full size set of the December 6th Release Sparkle Blends sequin mixes
- Gina K Designs - (2) $50.00 Gift Cards
- Gina Marie Designs - $15.00 Gift Card
- Honeybee Stamps - $25.00 Gift Card
- Janes Doodles - $50.00 Gift Card
- Jennifer McGuire - $100 Care Package
- Jessica Lynn Original - One Stamp Set of Winner's Choice! (PLUS 8% of all sales go directly to Coffee Oasis!)
- Joy Clair - $25.00 Gift Card
- Kat Scrappiness - is offering 15% off EVERYTHING IN THE STORE and is donating 15% of all sales during this blog hop to Coffee Oasis! Use coupon code: COFFEEOASIS to save! We are also giving away FOUR gift packages, each valued at $25.00 or MORE! We also have a care package from HERO ARTS to give away!
- Karen Burniston (KB Riley) - (2) sets of the dies used in the video
- Lawn Fawn - $25 Gift Card
- Lindy's Stamp Gang - $25 Gift Card
- Magnuson Custom Stamps - One FREE Custom Made Stamp!
- Neat & Tangled - $15.00 Gift Card
- Newton's Nook - $25.00 Gift Card
- Not2Shabby Shop - Five (5) Coffee First stamp sets.
- Paper Smooches - $25.00 Gift Card
- Precious Remembrance Shop - One (1) Everyday Stamp Set
- Pretty Pink Posh - Three (3) $30.00 Gift Cards
- Rinea - $25.00 Gift Card
- Scor-Pal - Three Gift Packs with products such as the Full Size Scor Pal, Scor-Tape and the Scor-Bug Embosser.
- Scrapping For Less - $15.00 Gift Card
- Technique Tuesday - $20.00 Gift Card
- Trinity Stamps - $30.00 Gift Card
- Whimsy Stamps - Two (2) $25.00 Gift Cards
- White Rose Crafts LLC - Two (2) $25.00 Gift Cards
Thank you for sharing your beautiful designs, I love the colors you used and the tree line die is just precious. Gotta have it!
ReplyDeleteThese are really beautiful cards! :)
ReplyDeleteThanks for sharing these beautiful cards. The one with the blue background is so pretty and like how you used the cut-out part for a second card.
ReplyDeleteBeautiful cards!!! Love so much the fabulous background of your first one!!!
ReplyDeleteLove the depth and dimension the blue card has.
ReplyDeleteBoth of your cards are gorgeous! Love that hill lined with trees die, my favorite is the blue one!
ReplyDeleteTina, this is such a stunning winters scene card. Love the landscape you created!
ReplyDeleteThe blue card is my favorite. I love the inlay of the trees. Blue my favorite color for winter cards. Thanks and hugs.
ReplyDeleteLovely cards - the glitter is awesome but the blue snowflake kisses is so pretty!
ReplyDeleteThese are gorgeous! i love the winter colors! And ovals!
ReplyDeleteReally ❤️ The blue & white Card!!!
ReplyDeleteWoah they're both so beautiful! <3
ReplyDeleteSimply elegant!!!
ReplyDeleteBeautiful! Love the colors for the blue card.
ReplyDeleteReally gorgeous! I love the colors of both!
ReplyDeleteThank you for participating. I am from Washington and was a resident in Kitsap for 15 years so this cause really caught my attention.
ReplyDeleteLovely cards. Really love the one in blues.
I will have to try your background method. I'm not really good at blending yet. Thanks for inspiring. Love your cards!
ReplyDeleteBeautiful cards! Love the backgrounds.
ReplyDeleteYour cards are so lovely!
ReplyDeleteI especially like the silver
and blue snowy scene!
LOVE your card!
ReplyDeleteThe Distress oxide technique just made that card stand head and shoulders above the other. Great job.
ReplyDeleteYour cards are gorgeous and I really love the first one with the blue and silver background!
ReplyDeleteLovely cards! I like how you used the die cut trees from the first card to create the second card. The Distress Oxide background is beautiful!
ReplyDeleteBoth cards are gorgeous! I really love the back ground on the first one. Thank you for explaining how you did it, I can't wait to try one or two like it. Thanks for sharing and the inspiration.
ReplyDelete#KatScrappinessCharityBlogHop #CoffeeOasis #AwarenessMatters (mardy14@bellsouth.net)
Love the blues and grey's Thanks for sharing.
ReplyDeleteLovely and so elegant :)
ReplyDeleteluv the background of your snowflake kisses card!!
ReplyDeleteBeautiful cards Tina, I love the first one
ReplyDeleteBoth are pretty card, I really love the first one!
ReplyDeleteNadine - My Scrap n' Stuff
Both are so pretty, love all the dies! The blue one is my fav!
ReplyDeleteWhat a beautiful winter card !
ReplyDeleteBeautiful card - thank you for sharing your talent with us!
ReplyDeleteLove both of your cards!
ReplyDeleteI love your beautiful winter cards. I love the blue and white one. It just looks cold!!! Brrrr.
ReplyDeleteLove your cards and really appreciate the details you shared in how you made them!
ReplyDeleteFabulous cards. I really love the blue one.
ReplyDeleteGreat use of a variety of products! Wonderful work!
ReplyDeleteBEautiful cards!
ReplyDeleteBeautiful cards and a great way of using both the positive and negative.
ReplyDeleteBeautiful use of dies...great cards.
ReplyDeletevery pretty cards..
ReplyDeleteBeautiful snowy scenes...esp love the first one!
ReplyDelete<3 J
jwoolbright at gmail dot com
HerPeacefulGarden.blogspot.com
Wow, so beautiful!
ReplyDeleteSweet cards. Love the sparkle!
ReplyDeleteThis window design is so lovely. Thanks for sharing this inspiration with these fun products.
ReplyDeletethanks for sharing your amazing inspiration, I just love you card - so elegant!
ReplyDelete