Sunday, February 24, 2019

You Make Anywhere Feel Like Home

Hi Everyone,
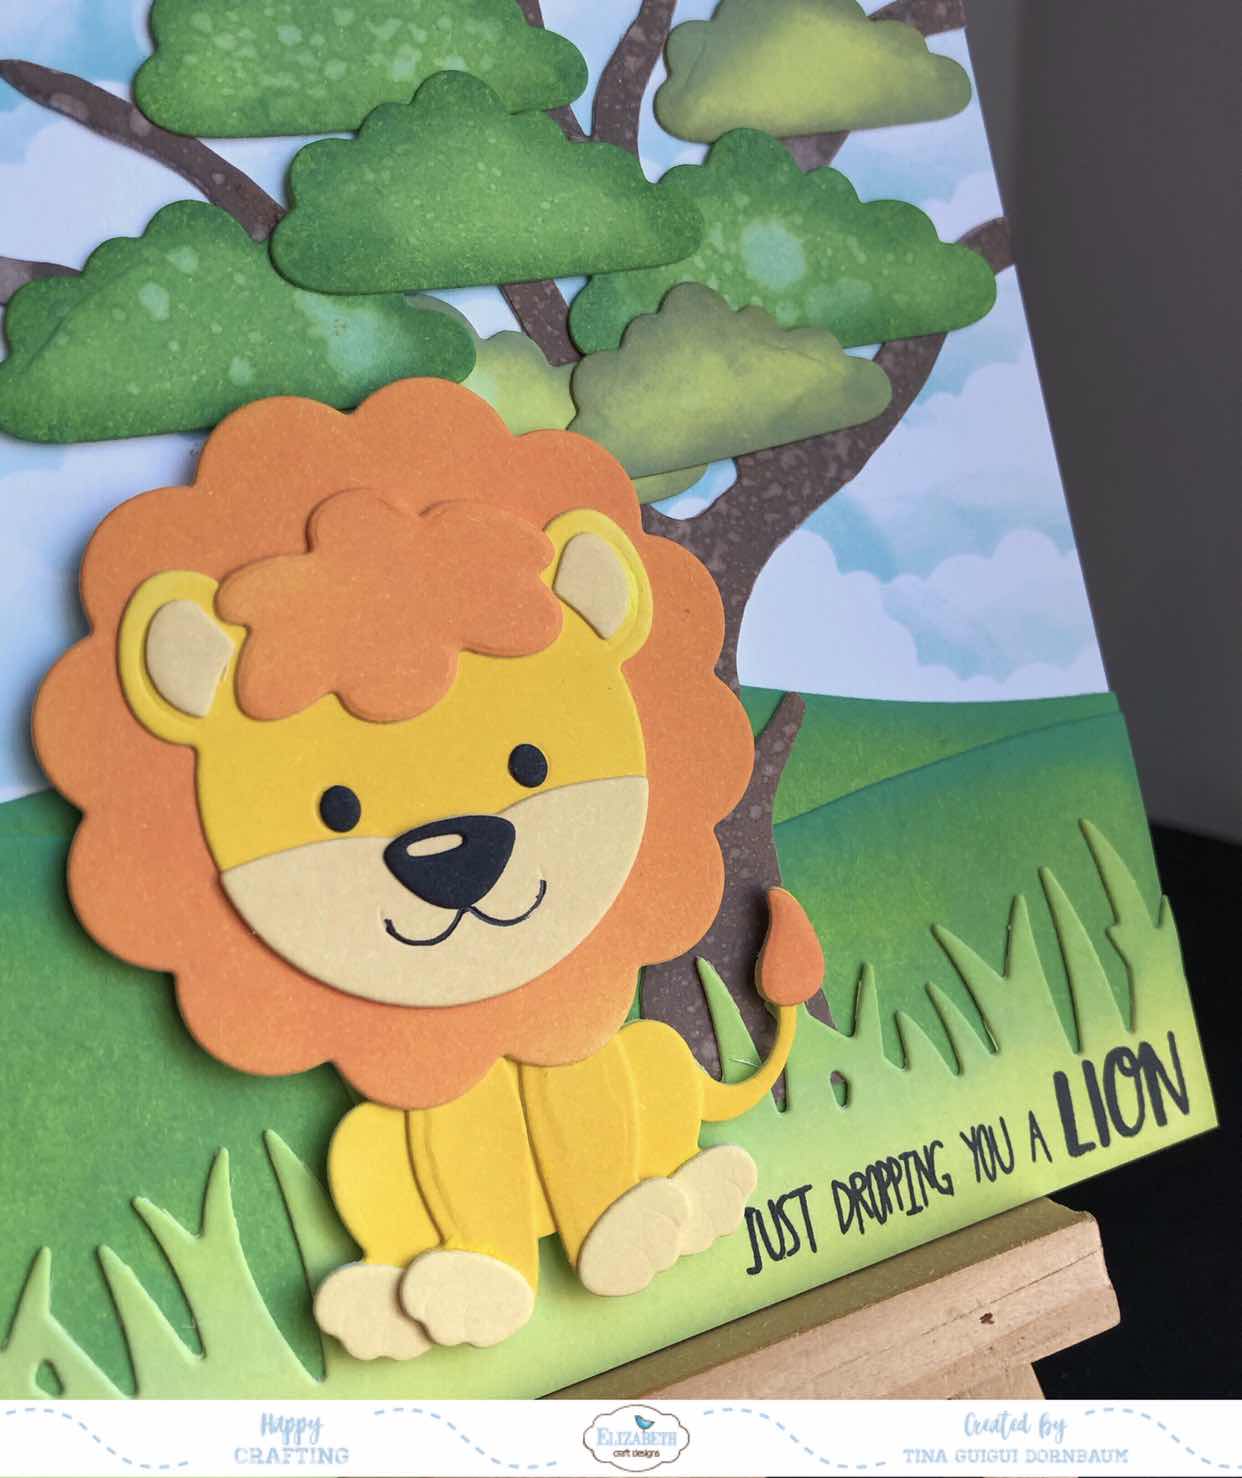
Happy Sunday. It's freezing rain here today and homebound so I decided to use the MTF Warm & Feathered Hugs stamp set along with the Mini Cloud Edges. I decided to forego the usual Tumbled Glass sky I usual do for a more girly color. Below you will find the steps to create your own card.


Step 1 - Trim White cardstock to 4 1/4" x 11 1/2", score at 5 1/2" and fold in half for a vertical size fold card.

Step 2 - Create clouds using the Mini Cloud Edges with Distress Oxide Ink with a Mini Ink Blending Tool. I used Seedless Preserves.

Step 3 - Stamp Warm & Feathered Hugs image using Versafine Clair Nocturne Ink on White Cardstock. Color in with medium of your choice. I used Winsor & Newton Promarkers. Diecut with matching die. Adhere to card using Nuvo Deluxe Adhesive.

Step 4 - Stamp Warm & Feathered Hugs sentiment using Versafine Clair Nocturne Ink to the bottom right of the card front. I placed washi tape over the word you since I will be diecutting the word you. Remember to remove the washi tape when you stamp onto the cardstock.

Step 5 - Cut 3 pieces of Black cardstock 2" x 3 1/2". Pass it through the Xyron Sticker Maker (if you don't have a sticker maker then you will have to use collage medium to adhere the 3 layers of the sentiment die. Diecut sentiment 3 times. Stack the layers and adhere to card slightly over the image.

Step 6 - For added interest adhere Pastel Girl Star Sprinkles using a Crystal Katana and collage medium.


I love the non traditional color of the sky which blends well with my colored image in fuschia and brown. Below you will find the link to all the products used. Thank you for stopping by and have a wonderful day.

Products Used:

Saturday, February 23, 2019

Just Dropping You A Lion

Hi Everyone,
Today's card is featuring the adorable Lion/Tiger Character die from Elizabeth Craft Designs. The fun part about this die is that you can make it into a cat. Today I chose you create the Lion. Below you will find the steps to create your own card.


Step 1 - Trim White Soft Finish 110lbs cardstock to 8 1/2" x 5 1/2", score at 4 1/4" and fold in half for a vertical side fold card. (A2)

Step 2 - Trim White Soft Finish 90lbs cardstock to 5 1/2" x 4 1/4". Diecut Adventure Edges using scrap piece of cardstock (the cloud die). Apply ink of your choice (I used Distress Oxide Ink) with an ink applicator to create the sky. The last layer of clouds should end a little more than half of your panel.

Step 3 - Diecut Adventure Edges (hillside die 2 times) using Colored cardstock or White Soft Finish cardstock (90lbs) and ink it with Distress Oxide. Adhere to card using 3mm Clear Double Sided Adhesive Tape.

Step 4 - Diecut Tree using Colored cardstock or White Soft Finish cardstock (90lbs) and ink it with Distress Oxide. Brown color for tree trunk and 2 shades of green for the leaves. Assemble and adhere to card using Kids Choice Glue. See photo below


Step 5 - Diecut Adventure Edges (grass) using Colored cardstock or White Soft Finish cardstock (90lbs) and ink it with Distress Oxide.

Step 6 - Stamp Safari Sayings using Versafine Clair Nocturne Ink to the bottom right side of the grass created from Step 5. Adhere the grass to card using Kids Choice Glue.

Step 7 - Diecut Lion/Tiger using Colored cardstock or White Soft Finish cardstock (90lbs) and ink it with Distress Oxide. See photo below for color reference. Assemble the Lion using Kids Choice Glue and adhere to card using Foam Tape.


This card was so much fun to make and makes anyone smile who receives it. As mentioned above the dieset can be used to also make a Tiger or cat. Below is a link to the products used. If you place an order with Kat Scrappiness be sure to use code: TINA10 at checkout to receive 10% off. If placing an order with Elizabeth Craft Designs and you are in the US there is free shipping for orders over $50. Thanks for stopping by and have a wonderful day.

Products Used:
<

Tuesday, February 19, 2019

Floral Background Pencil Coloring Using Gamsol And Alcohol Ink Blending Pen

Hi Everyone,
Today I have a card to share with you using the stunning Floral Background from Elizabeth Craft Designs with colored pencils, gamsol and an alcohol ink blending pen. Below are the steps to create your own Floral Background card.


Step 1 - Trim White Soft Finish cardstock to 8 1/2” x 5 1/2”, score at 4 1/4” and fold in half for a horizontal side fold card (A2)

Step 2 - Stamp Floral Background using Versafine Clair Nocturne Ink. Pour some Gamsol in an Alcohol Ink Blending Pen. This will allow for easier blending with coloured pencils. Color image by applying coloured pencil then using the Alcohol Ink Blending pen to blend in the colors. This will also smooth out the colouring. A tip I saw from Jennifer McGuire and Simon Hurley. 


Step 3 - Trim Black cardstock to 4” x 5 1/4” and adhere to card using Nuvo Deluxe Adhesive. Trim Background created from Step 2 to 3 3/4” x 5” and adhere to card using Nuvo Deluxe Adhesive. 

Step 4 - Stamp Banner Sentiment using Versamark on Black cardstock, sprinkle White Embossing Powder, remove excess and heat set it with a heat tool. 

Step 5 - Diecut Stitched Fishtail Banners to the sentiment created from Step 4. Adhere to card using Foam Tape. 

Step 6 - Optional - Adhere left over Floral Background created from Step 2 to the inside of card using Nuvo Deluxe Adhesive. It measures 1 1/2” x 5 1/2”. 

Step 7 - Optional - Stamp Banners Sentiment using  Versafine Clair Nocturne Ink to the inside of the card above the Background Strip. 


If you like colouring with pencils then the Alcohol Ink Blending Pen makes it easier and quicker. I highly recommend it. This can can be used for any occasion by changing the sentiment and colors. Below is a link to the products used. Thank you for stopping by and have a wonderful day. 

Products Used:

Sunday, February 17, 2019

Elegant Easter Egg Shaped Card

Hi Everyone,
Today I have a super fun shaped egg card for Easter. Elizabeth Craft Designs have a new Elegant Easter Egg Large die. It is a solid die with a design die. Below I will show you how to create a shaped egg card.


Step 1 - Trim White Soft Finish 110lbs Cardstock to 11 1/2" x 4 1/4", score at 5 1/2" and fold in half for a horizontal top fold card.

Step 2 - Diecut Elegant Easter Egg Large (solid) by off setting the top of the die at the top where the fold is on the cardstock. This will diecut but leave the top uncut. See photos below.


Step 3 - Diecut Elegant Easter Egg Large (solid) using White Soft Finish 110lbs Cardstock. Using a Picket Fence Life Changing Brush apply Seedless Preserves, Barn Door and Spiced Marmalade randomly. Once completely inked Diecut Elegant Easter Egg Large (design). Adhere to top of card using Nuvo Deluxe Adhesive.

Step 4 - Stamp Spring Sentiments using Versamark on Black Soft Finish Cardstock. Sprinkle White Embossing Powder, remove excess powder then heat set with a heat tool.

Step 5 - Diecut Stitched Fishtail Banner Die to sentiment created in Step 4. To get both ends fishtailed turn the diecut around and find the grooves from the first diecut. Use Painters Tape to secure before diecutting. Adhere to card using Foam Tape.

Step 6 - Optional - For added interest adhere some of the negative pieces created from the diecut created from Step 3 to the inside of the card. Adhere using Nuvo Deluxe Adhesive.


I hope you enjoyed this easy trick to getting a non traditional shaped card. Below is a link to the products used. Thank you for stopping by and have a wonderful day.

Products Used:

Friday, February 8, 2019

Sending Warm And Feathered Hugs

Hi Everyone,
I haven't made many winter cards this season with the exception of holidays cards. So today I sharing a card I made with the Warm & Feathered Hugs Stamp set. Below is the steps used to create this card.


Step 1 - Trim White Cardstock to 8 1/2" x 5 1/2", score at 4 1/4" and fold in half for a vertical side fold card. (A2)

Step 2 - Trim White Cardstock to 5 1/2" x 4 1/4". Ink Mini Cloud Edges stencil on the cardstock using Distress Oxide Ink with an mini ink blending tool to create the clouds. Stop a little more than halfway down. Adhere to card using Nuvo Deluxe Adhesive.

Step 3 - Diecut Stitched Hillside Borders using White Cardstock x 2. Adhere to card using Nuvo Deluxe Adhesive.

Step 4 - Stamp Warm & Feathered Hugs image using Gina K Amalgam Ink (This is an alcohol marker friendly ink) & Simon Says Stamp Steel Blue Ink for the trees. Color image using Alcohol Markers. I used Winsor & Newton Promarkers. Yes I'm old school. LOL. Diecut matching images. Adhere the image using Foam Tape and the trees using Nuvo Deluxe Adhesive.

Step 5 - Stamp Warm & Feathered Hugs sentiment using Simon Says Stamp Steel Blue Ink to the bottom of the card.

Step 6 - For added interest add Sequins using a Crystal Katana and adhere using Collage Medium.


This card can be used for several occasions by changing the sentiment and colors. To receive $5 off your order at Simon Says Stamp use Promo Code: CNFF99. It's good until March 1, 2019. Below is a link to all the products used. Thank you for stopping by and have a wonderful day.

Products Used:

Sunday, February 3, 2019

Simon Says Stamp And Case This Sketch 307

Hi Everyone,
Today I found myself looking at YouTube Videos and my stash, going back and forth and felt in a slump. Once in a while this happens. Then it hit me and I headed on over to the Case This Sketch Challenge Blog. Whenever I need some inspiration when nothing else is inspiring me a great sketch always helps me out. What I love about Case This Sketch is that it is for Clean and Simple cards and this is not normally my style and yet every card I made using their sketches I have been so happy with the results. Below you will find the steps how I created this card.


Step 1 - Trim White Cardstock to 8 1/2" x 5 1/2", score at 4 1/4" and fold in half for a vertical side fold card (A2).

Step 2 - Trim Black Cardstock to 1 3/8" x 4 1/4" and adhere to bottom of card using Nuvo Deluxe Adhesive.

Step 3 - Stamp Modern Rose Blooms on White Cardstock using SSS Cobblestone Ink. Trim to 1 1/4" x 4 1/4" and adhere to bottom of card using Nuvo Deluxe Adhesive.

Step 4 - Stamp Take Heart sentiment using Versafine Clair Nocturne Ink above the border towards the left side.

Step 5 - Diecut Heart Wafer using Black Cardstock for shadow die and White Cardstock for sentiment die. Adhere sentiment diecut to shadow diecut using Collage Medium. Adhere to card using Collage Medium.

Step 6 - Stamp Take Heart (Hummingbird) on White Cardstock using Gina K Amalgam Ink. Color in the Humingbird with medium of your choice. I used Alcohol Markers. Fussy cut the image and adhere to card using Foam Tape.

Step 7 - For added interest adhere Crystal Nuvo Drops Morning Dew.


I hope you enjoyed today's card. This card can be used for any occasion by changing the sentiment, colors and image. Below is a link to all the products used. Thank you for stopping by and have a wonderful day.

Products Used:
 

Saturday, February 2, 2019

Sending Some Love

Hi Everyone,
By now you've seen the new release from Elizabeth Craft Designs by Joset Designs. Her character dies are just awesome. The Monkey, Lion & Tiger, Zebra, Giraffe and Little Chick have joined the collection. So I thought the Monkey would be a fun way to share some love. Below you will find the instructions to create your own card.


Step 1 - Trim White Soft Finish cardstock to 8 1/2” x 5 1/2”, score at 4 1/4” and fold in half for a vertical side fold card. (A2)

Step 2 - Trim Patterned Paper to 4" x 5 1/4". Diecut Entwined Hearts using the Patterned Paper. Adhere the outer negative piece to the front of card using 3mm Clear Double Sided Adhesive. Diecut Entwined Hearts using Brick Red Soft Finish Cardstock. Adhere to card using Kids Choice Glue leaving a small area on the upper left side without glue. This will allow you to entwine the monkey tail so it looks like its hanging on.

Step 3 - Diecut Monkey using colored cardstock or ink it yourself. I used Distress Oxide Inks on scrap pieces of cardstock (Scattered Straw and Walnut Stain with a Picket Fence Life Changing Brush). Assemble the Monkey using Kids Choice Glue.

Step 4 - Diecut Balloons (Heart) using Brick Red Soft Finish Cardstock. Stamp Safari Sayings to the Heart Balloon diecut using Versamark Ink. (I masked part of the sentiment so I could stamp I love you. Remember to remove the mask after inking.) Sprinkle White Embossing Powder, remove the excess. Heat set it with a heat tool. Adhere to card using 3mm Clear Double Sided Adhesive. Adhere Monkey created from Step 3 using Kids Choice Glue.


I hope you enjoyed today's card. It was super easy to put together and took no time at all. Below is a link to all the products used. Thank you for stopping by and have a wonderful day!

Products Used: