Tuesday, January 31, 2017

Club Scrap Artist Team Challenge Batik Technique

Hi Everyone,

Welcome back to the first Club Scrap Artist Team Challenge for 2017. Since the January 2017 Color Me Happy kit was inspired by batik designs and artwork, this month we were challenged to create a project that features batik or faux batik techniques. I chose to do my batik technique challenge using the Color Me Happy Kit.


Now first things first if you came from Lisa's blog then to came from the right place. If you didn't you can start at the beginning with Karen at Club Scrap's blog.


Here is a picture of all the cards with the Batik Technique using Color Me Happy Kit. Below you will find the steps to recreate these cards.


Finished cards measures 4 1/4" x 5 1/2" folded

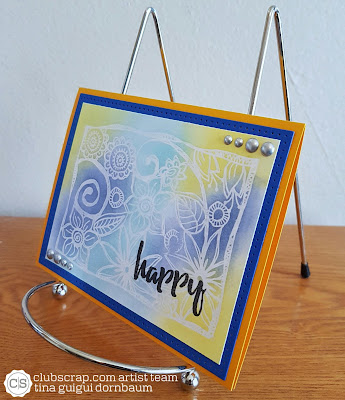
For my first card I cut plain cardstock 8 1/2" x 5 1/2" for the base of my card, fold in half. I stamped the image from the Color Me Happy Jumbo Unmounted Stamp on Plain White Cardstock using the watermark ink pad. I sprinkled clear embossing powder and heat set. Once it cooled down I used 3 distress inks and randomly applied it in sections. Once I was happy I turned it facedown on a paper towel and heat it with my heat gun. The purpose of this is to have the embossed areas fall off so that your paper remains smooth. I also noticed that my inks felt soft as well. I trimmed the edges and matted with plain cardstock, trimmed the edges and then adhered to center front of my card. I added some Metallic Dot Stickers. Last I stamped the sentiment Happy from the Art Nouveau Unmounted Stamps.


Finished card measures 4 1/4" x 5 1/2" folded

For my second card I cut plain cardstock 8 1/2" x 5 1/2" for the base of my card and folded in half. I used the same technique as the first card this time stamping the dragonflies from Art Nouveau & Jumbo Unmounted Stamps (both are different sizes) and with my distress inks I created a different series of colors and pattern. Once all the embossing was removed I added some random sequins. I added the sentiment Choose to Shine from the Art Nouveau Unmounted Stamp. I diecut the green plain cardstock using Stitched Rectangles from Elizabeth Craft Designs and adhered to center from of card. Last I added the Faux Batik design to center front of card.


Finished card measures 4 1/4" x 5 1/2" folded.

For my third card I cut plain cardstock 8 1/2" x 5 1/2" for the base of my card and folded in half. I used the same technique as the previous two cards however this time instead of coloring with distress inks I used Andirondak Color Wash Sprays. I was really happy with this result. I trimmed my batik design and adhered to center front of card. I created a frame using the Dotted Scallop Rectangle Die and Fitted Rectangle Die from Elizabeth Craft Designs and adhered to center front of card using pop ups. I stamped the Thank you sentiment from the Greeting Unmounted stamps.


Thanks for stopping by. Now to continue the fun head on over to Anne Marie's blog.

Wednesday, January 25, 2017

Club Scrap Color Me Happy January Blog Hop

Hi Everyone, 

Welcome to the first Blog Hop of 2017 with Club Scrap's Color Me Happy Kit. What a way to start the New Year!!! I just love this kit.  The colors are absolutely vibrant and sure to get you out of the winter blues. Now first things first if you came from Julie's blog then you came from the right place. If you didn't you can start at the beginning with Karen at Club Scrap's Blog.

Before we begin I have a fabulous giveaway!!! I'm giving away an Aquarelle Brush Set 18 pack to a lucky winner.  All you have to do is follow my blog for a chance to win. You have until February 5 to follow my blog. If you want to be entered a second time then be sure to post this giveaway on your social media platforms. Leave a comment below and let me know you have posted it on facebook or instagram. Here is the fabulous prize.


Finished measures 4 1/4 x 5 1/2 folded

For my card I used the patterned designs from the Digital Kit. I used a plain cardstock for the base of my card. It measures 8 1/2 x 5 1/2, fold in half. I cut a plain cardstock 4 x 5 1/4 and embossed it with a Sizzix embossing folder then adhered to center front of card. I used the Dotted Scallop Rectangle Die with the Stitched Rectangle Die from Elizabeth Craft Designs to create a background window. I created the cherry blossoms by drawing a 5 petal flower on corel and then cut it out on my scanncut. I shaped the petals and assembled the top and bottom layer. Bottom layer the petals go up and top layer the petals go in. I added some prills to the center of flowers. I added 2 rose flowers from I Am Roses. I diecut some leaves and topped it with a mesh butterfly. The sentiment is also from the digital kit.


When I saw this fabulous kit I just knew I had to make a new Happy Planner cover. It just made me so happy that I felt like it was made for it.  Who wouldn't want to look at this cover everyday.


I cut out my cover from the 12x12 patterned paper to 7 1/2" x 9 1/2". I cut a strip of the plain teal paper and heat embossed the word "Happy" and the "Flower" stamp (both are in the kit). I used a piece of the cut-a-part with the dragon flies. I have a thing for dragon flies. Then I matted the teal strip with a strip of brown. Once everything was in place I used my laminator to give my cover sturdy protection. I passed it a few times. Once it cooled down I used one of my happy planner pages as a template to cut the holes with a single hole punch and then scissors for the slits. 


I didn't stop there. I decided I needed a matching bookmark. With the left over strip of the same 12x12 patterned paper I cut 2 strips, measuring 6 1/4 x 2 1/2. I passed it in my laminator a few times. I cut a hole on the top center with the single hole punch. Then I attached 2 Club Scrap ribbon's through the hole. Now I can get to my important reminders quicker!


Thanks for stopping by. Now head on over to Lisa's blog.


Tuesday, January 24, 2017

Elizabeth Craft Designs Cute Critters Challenge

Hi Everyone, 

Welcome to the first Coloring Challenge from Elizabeth Craft Designs. 2017 started with lots of new product at Elizabeth Craft Designs. Coloring stamps is a new line. They are super fun and there is a category for any occasion. Today's challenge is Cute Critters. There is a fun assortment of critters in the new line. I chose the Birch Forest set with the matching Birch Forest dies.


Here are the steps to recreate this card. Finished card measures 4 1/4" x 5 1/2".
  1. Cut base of card on plain cardstock 8 1/2" x 5 1/2". Fold in half.
  2. Cut a plain cardstock in green 4"x5 1/4" and adhere to center front of card.
  3. The background scenery - with 2 different color tones in green on plain cardstock tear 2 strips each (total 4 strips green). Layer each with one alternating the green tones. With the Earth & Sky stencil create a sky (or use plain blue cardstock) and layer it. Adhere to center front of your card.
  4. Diecut with Through The Lens Wood 6"x6" patterned paper using the Dotted Scallop Rectangles die and Fitted Rectangles die to create a window. Adhere to center front of card.
  5. Color the deer and birch tree from the . Once finished use the matching die set to cut your shapes. Adhere to card with the deer coming though the birch.
  6. Stamp Hello sentiment or sentiment of your choice with Clear Stamp General Sentiments


Thanks for stopping by. Be sure to visit Elizabeth Craft Designs Blog to see what the rest of the team did.

Monday, January 23, 2017

Club Scrap January Kit Color Me Happy

Happy Monday Everyone,

Today I am showing you some cards I made using the Club Scrap Color Me Happy Kit. Be sure to grab yours before it's too late. This is a vibrant kit. Be sure to check out Club Scrap's blog as well for more inspiration using this kit.

Finished card measures 4 1/4" x 5 1/2" folded

For this card I let the 8 1/2" x 11" patterned paper speak for itself. All I did was trim in half to 8 1/2" x 5 1/2" and then fold in half. I used the fabulous Metallic Craftwork Pen included in the kit to faux stitch all around the edges. I colored the Happy Birthday sentiment with the marker and then stamped it to the top corner. I have never used a metallic marker before with such ease. This is a must have!!!


While waiting for the Paper Kit I had made use of the Digital Kit. I love the details in the digital kit because I get to resize to what I need. The digital can be used in several ways. You can use a software such as Illustrator to combine all your elements or you can print the images directly on cardstock and use like a paper kit. I used the latter as I always do.

Finished card measures 4 1/4" x 5 1/2" folded

I used plain cardstock for the base of my card. I cut it 8 1/2 x 5 1/2, then fold in half. Folded the card measures 4 1/4 x 5 1/2. Cut pattern design 4 x 5 1/4 and adhere to center front of card. I cut a strip boarder and adhered to right side of the card. I cut a plain piece of cardstock 2 1/4 x 3 1/2 and embossed with a Sizzix embossing folder. I used the rectangle patterned piece with the word Happy and matted it with the embossed paper. I adhered to the center but to the right side of the card. With my Curvy Leaves Die from Elizabeth Craft Designs I diecut the leaves, adhered them to the bottom right edge of my matted sentiment and topped it off with a cherry blossom from I Am Roses. Now this card just screams Happy!


Thanks for stopping by. Be sure to come back on Jan.25 for Club Scrap's Blog Hop. I will be having a giveaway you don't want to miss.

Monday, January 2, 2017

Club Scrap Color Me Happy Kit with Mojo Monday 478 Sketch Challenge

Hi Everyone,

Welcome back to the first Club Scrap post with an awesome Kit to kick start the New Year! The Color Me Happy Kit just makes me Happy!!! The colors are gorgeous and vibrant. A far cry from the white scene outside my window. I am using Mojo Monday's 478 Sketch Challenge.


Finished card measures 4 1/4" x 5 1/2"


I am using the Color Me Happy Digital Kit while I wait for the paper kit. The base of my card is plain cardstock cut 8 1/2" x 5 1/2" and folded in half. I printed the background patterns and cut-a-parts on white cardstock, cut it out and placed on the front of my card. I used my scanncut to cut the flower shape to make a cherry blossom. I added Prills to the center of the flower. The ribbon is from my stash. I printed the sentiment on cardstock and attached with a pop up.


Thanks for stopping by.  Don't forget I have an ongoing giveaway for some dies, nuvo crystal drops, paper & some other goodies. You have until January 31 to follow my blog for a chance to win.