Wednesday, September 27, 2017

Club Scrap Orchard Kit Blog Hop and Linky Party

Hi Everyone,
Welcome to the Club Scrap Orchard Kit Blog Hop and Linky Party. Before we get started if you came from Lisa's Blog then you came from the right place. If you didn't you can start with Karen from Club Scrap's Blog. I have quite a few cards to share using the Orchid Paper Kit and the Orchard Digital Kit.

Finished card measures 4 1/4" x 5 1/2" folded

This card I used the Paper Kit. The base is plain cardstock. I trimmed the patterned paper to 4" x 5 1/4" and inked the edges. Since this was perfect to use for the Jewish New Year I printed a sentiment on Paris Flea Market white cardstock, diecut it with fishtail banners, inked the edges and adhered to the card. 


Finished card measures 4 1/4" x 5 1/2" folded

This card I used the Paper Kit. The base is plain cardstock. I trimmed the patterned paper to 4" x 5 1/4" and inked the edges. Since this was perfect to use for the Jewish New Year I printed a sentiment on Paris Flea Market white cardstock, diecut it with fishtail banners, inked the edges and adhered to the card.


Finished card measures 4 1/4" x 5 1/2" folded

This card is using the Paper Kit. The base is using plain cardstock. The background is patterned paper trimmed to 4" x 5 1/4". I trimmed the cut-a-part and stamped the sentiment with embossing ink then heat embossed with gold embossing powder. I used a simple technique to create embossed splatters by using a paint brush with water on the tip and splashing all over. Then I sprinkled gold embossing powder and heat set. This takes a while as it is water and it needs more heating time.


Close up of splattered gold embossing.

Finished card measures 4 1/4" x 5 1/2" folded

This card is using the Digital Kit. The base of the card is white cardstock from the Paris Flea Market. I created a wood background panel with a bone folder creating lines vertical and horizontal. I used the Distress Inks directly to the paper by going up and down. I used 3 colors. See below for colors. I printed the cut-a-part design on white cardstock and adhered it to the front of card with string to look like it was hanging.


Finished card measures 4 1/4" x 5 1/2" folded

This card is using the Digital Kit. I printed all the designs on white cardstock. The base of the card is using the white Paris Flea Market cardstock. I trimmed the patterned background and adhered to the front of card. I colored the fruit design with promarkers so easy blending. Once colored I adhered to the front of card. I printed the sentiment and adhered to the top right corner.


Thanks for stopping by. Your next stop is Julie's Blog.

Tuesday, September 19, 2017

Elizabeth Craft Designs Artist Team September Challenge

Hi Everyone,
Welcome back to the Elizabeth Craft Designs Artist Team Challenge. Every month the Artist Team is challenged with a theme to showcase the fabulous product from Elizabeth Craft Designs. This month the challenge is Spooktacular Creations.

There is a chance for you to win a $20 gift card. Visit the Elizabeth Craft Designs Blog Post. Leave a comment and answer this question. What are some of your favorite products when creating spooky scenes for Halloween? 3 lucky winners will be chosen in a random drawing.


Below you will find the easy steps to replicate this card.

  • Step 1 - Cut Orange Soft Finish Cardstock 8 1/2" x 5 1/2". Score and fold in half to form a vertical side-fold card base. Finished size:  4 1/2" x 5 1/2" (A2)
  • Step 2 - Trim Black Soft Finish Cardstock to 4 1/8" x 5 3/8" and adhere to center front of card using 3mm Clear Double Sided Adhesive Tape
  • Step 3 - Create your background (Optional - You can use Halloween Patterned Paper instead). I used Oxide Inks with White Soft Finish Cardstock to create a spooky sky background. I added some colors of the Oxides Inks onto a kraft mat, spritzed some water and dipped the White Soft Finish Cardstock on top. Dry with a Heat Gun. Repeating this several times. In between dips and heat drying I sprayed some water for some water effects. Let dry. See below for finished background.
  • Step 4 - Trim the background to 4" x 5 1/4" and adhere to the center front of card using 3mm Clear Double Sided Adhesive Tape.
  • Step 5 - Diecut Black Soft Finish Cardstock with Halloween Scenary. The tree, graveyard and bat. You will need to diecut the bat 2 more times.
  • Step 6 - Stamp sentiment Boo from Halloween Clear Stamps with an embossing pad and sprinkle white embossing powder. Heat set.
  • Step 7 - Adhere graveyard diecut to bottom of background with 3mm Clear Double Sided Adhesive Tape and Kids Choice Glue. The glue will dry clear. I used it randomly but left the top part of the graveyard glue free. The loose parts will add dimension.
  • Step 8 - Trim spooky tree and adhere to background at the top left with Kids Choice Glue. (see photo below for visual of cut tree)
  • Step 9 - Adhere the 3 bats with Kids Choice Glue.

Mini Tag

I had so much fun that I decided to do a quick Mini Tag.
  • On White Soft Finish Cardstock I created a background using Oxide Inks.
  • Diecut the background using Tags & More 4 Flourish.
  • Stamp and color Halloween Clear Stamp then diecut with matching die.
  • Diecut some leaves with Pumpkins.
  • Create the scene - adhere pieces with 3mm Clear Double Sided Adhesive and for smaller pieces using Kid's Choice Glue.
  • Optional adhere a ribbon through the hole at the top of the tag.

Thanks for stopping by. Before you go don't forget to go to the Elizabeth Craft Designs Blog and in the comments answer the question for a chance to win a $20 gift card. Below is a list of links to all products used for your easy convenience.

Elizabeth Craft Designs
Product Used


Other Product
Oxide Ink
Embossing Pad
Emboss Powder White
Heat Tool

Club Scrap September Artist Team Challenge Watercolor Feel

Hi Everyone,
Welcome to the Club Scrap Artist Team Challenge. This month we were challenged to create a "Watercolor" feel to our projects. Below you will find some cards I made with a watercolor feel to it. Before we get started if you came from Roni's Blog then you came from the right place. If you didn't you can start at the beginning with Karen from Club Scrap's Blog.

Finished card measures 4 1/4" x 5 1/2" folded

The base for this card is White Cardstock from the Paris Flea Market Collection. I took out my Gelli Plate and decided to try watercolor paint instead of acrylics. I was very pleased with the results. With a wide brush I spread purple, pink, red, orange and yellow. Using the White Cardstock from Paris Flea Market I placed it on top of the Gelli Plate. Once dry I stamped the image of the flower from the Vintage Botany Collection on top with Black India Ink. I diecut the panel with a Dotted Scallop Rectangle Die and matted with Black Cardstock also from the Paris Flea Market.


Finished card measures 4 1/4" x 5 1/2" folded

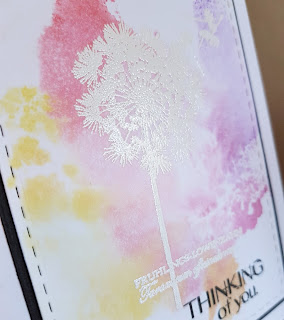
The base for this card is White Cardstock from the Paris Flea Market Collection. The panel for this card is using the ghost print from the same technique of previous card. I loved how this print is faded and I knew the Dandelion stamp from the Vintage Botany Collection embossed in white would create an even softer dreamy effect. The sentiment was printed from the Orchid Digital Kit but when I tried to select only this sentiment and imported in my graphic program it printed funny. However since this is a dreamy effect I decided it was perfect for my dreamy card. I diecut the panel with a Stitched Rectangle Die and matted with Black Cardstock from the Paris Flea Market.


Finished card measures 4 1/4" x 5 1/2" folded

The base for this card is the Green Cardstock from the Orchid Collection. On White Cardstock from the Paris Flea Market I cleared embossed the flower from the Wild Rose Collection. This probably wasn't the best stamp to use for the effect I wanted but I liked the results. With watercolor paint I colored in the stamps and added some Sparkle Shimmer Spritz for a sparkly effect. It's hard to see but it is pretty in real life. I trimmed the panel to 3 7/8" x 5 1/8" and matted it to the Yellow Cardstock trimmed to 4" x 5 1/4". The sentiment is from the Cherry Blossoms Collection and stamped in Black India Ink.


Thanks for stopping by. Your next stop is Lisa's Blog.
Sunday, September 10, 2017

Club Scrap Orchard Kit and Case This Sketch 238

Hi Everyone,
Today I am showing you a card I made using the Club Scrap Orchard Kit and Case This Sketch #238. While waiting for the paper kit to arrive I used the Digital Orchid Kit. If you haven't tried the Digital Kits I highly recommend it. It's not expensive and if you are not familiar with computer software then you can always print out the designs on white cardstock like I have. Below you will find the steps used to create this card.

Case This Sketch #238

Finished card measures 4 1/4" x 5 1/2" folded

I printed the cherries and design background on white cardstock (white cardstock is from the Paris Flea Market Collection). I trimmed the base of card to 8 1/2" x 5 1/2". I selected the sentiment from the Orchard Digital Kit and printed directly to the lower right bottom before folding my card in half. Using a Dotted Scallop Squares die I diecut the design background and adhered to the front of my card with hand made double sided adhesive foam strips. (I will have a tutorial shortly on how to create your own pop-ups). I diecut white cardstock using a Stitched Squares die and then embossed it with a Spellbinders Embossing Folder. I adhered it on top of the design background with clear double sided adhesive. I used my scanncut to cut the image of the cherries and adhered on top of the embossed paper. A simple and clean card which took no time at all.


Thanks for stopping by. Before you go be sure to mark your calendar for the Club Scrap Artist Team Challenge Hop which will be on September 19. 


Tuesday, September 5, 2017

Club Scrap Bleach Technique With Lagoon Kit

Hi Everyone,

Today I'm reintroducing an old technique using the Club Scrap Lagoon Kit stamps. Bleach Technique. I knew the stamps from Club Scrap Lagoon Stamps would be a fun way to bring it back. Below you will find the steps for the technique and card I created.

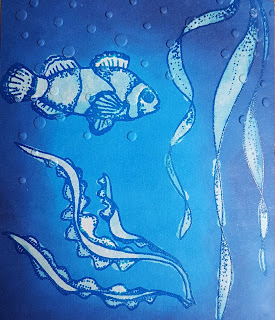
You will need to use an ink pad directly on white cardstock (I trimmed to 4 1/4" x 5 1/2"). I used distress inks salty ocean. Once the cardstock was completely covered I blended chipped sapphire to the edges. You will need to let the cardstock dry completely before moving to the next stage. I used a heat gun to speed up the process.

I used salty ocean to stamp the seaweed and fish. Before it dried I sprinkled clear embossing powder and heat set. For next step please be careful with the bleach at all times. Pour some bleach into a small container and using a fine tip brush begin to apply inside the embossed areas. The bleach will change the color and create a lighter color than your background. If you add a second layer to some areas those areas will turn even lighter. Below is a close up of my finished Bleach Technique. Now it's ready to place on my card.


I decided to add some "bubbles" using a snow embossing folder. I placed the background partially inside the folder so it wouldn't emboss the entire panel.

Finished card measures 4 1/4" x 5 1/2" folded

The base of the card is the Blue cardstock from Color Me Happy. I trimmed the panel I created and matte it with Lt. Teal cardstock from Lagoon. The sentiment is from the Lagoon collection and matted with the same two cardstocks.


I hope you enjoyed an oldie but goodie technique. Come back soon to see the new Club Scrap Orchid Kit. Thanks for stopping by!