Monday, October 30, 2017

Club Scrap October Artist Team Challenge

Hi Everyone,

Today is the Club Scrap October Artist Team Challenge. This month the Artist Team was asked to select a video from Club Scrap’s YouTube Channel and make a project using that inspiration. I chose the Pocket Planner Project. Tricia's video is very clear with her instructions and for the first time ever I created my first Pocket Planner. Before we get started if you came from Roni's Blog then you came from the right place.  If you didn't you can start at the beginning with Karen from Club Scrap's Blog.

I used the Literature Planner Pocket Project for the manila envelopes, chipboard and library Pocket. I used the Orchard patterned paper and cut-a-part to decorate my Pocket Planner covers and inside pages. The title for my Planner Pocket is the sentiment from the Orchard Kit embossed in Gold. 


Thanks for stopping by. Your next stop is Lisa's Blog. For more Club Scrap YouTube inspiration please go here.


Wednesday, October 25, 2017

Club Scrap Scandinavia Blog Hop and Linky Party

Hi Everyone,

Welcome to the Club Scrap Scandinavia Blog Hop and Linky Party.  Before we started started let's take care of business.  If you came from Lisa's Blog then you came from the right place. If you didn't you can start at the beginning with Karen from Club Scrap's Blog.

Finished card measures 4 1/4” x 5 1/2” folded


I just love the flowers from the Scandinavia kit and wanted to showcase them so I decided to create a Pop-Up card. I have a wonderful die to help with the cut but if you don’t have a die it is quite easy. Your inside panel with the pop up will be 4" x 5 1/4". Fold your inside panel in half, on the fold line find your middle point. It will be 2” for this card. On either side mark at 1/2” from center point. From those points go up and down 1/2” from fold line and mark it. You will now cut 2 vertical lines on either side of the center mark. Fold your panel in half and now fold the center slit you created going in opposite direction. Open the panel and bring the center piece out. Now adhere the panel to the card base.

I kept the front simple with a sentiment and two strips of design from the Scandinavia Digital Kit. The inside two flowers were trimmed with my scanncut and adhered to the pop up. I added a cut-a-part piece on the inside bottom to write on the card. 


Finished card measures 4 1/4" x 5 1/2" folded

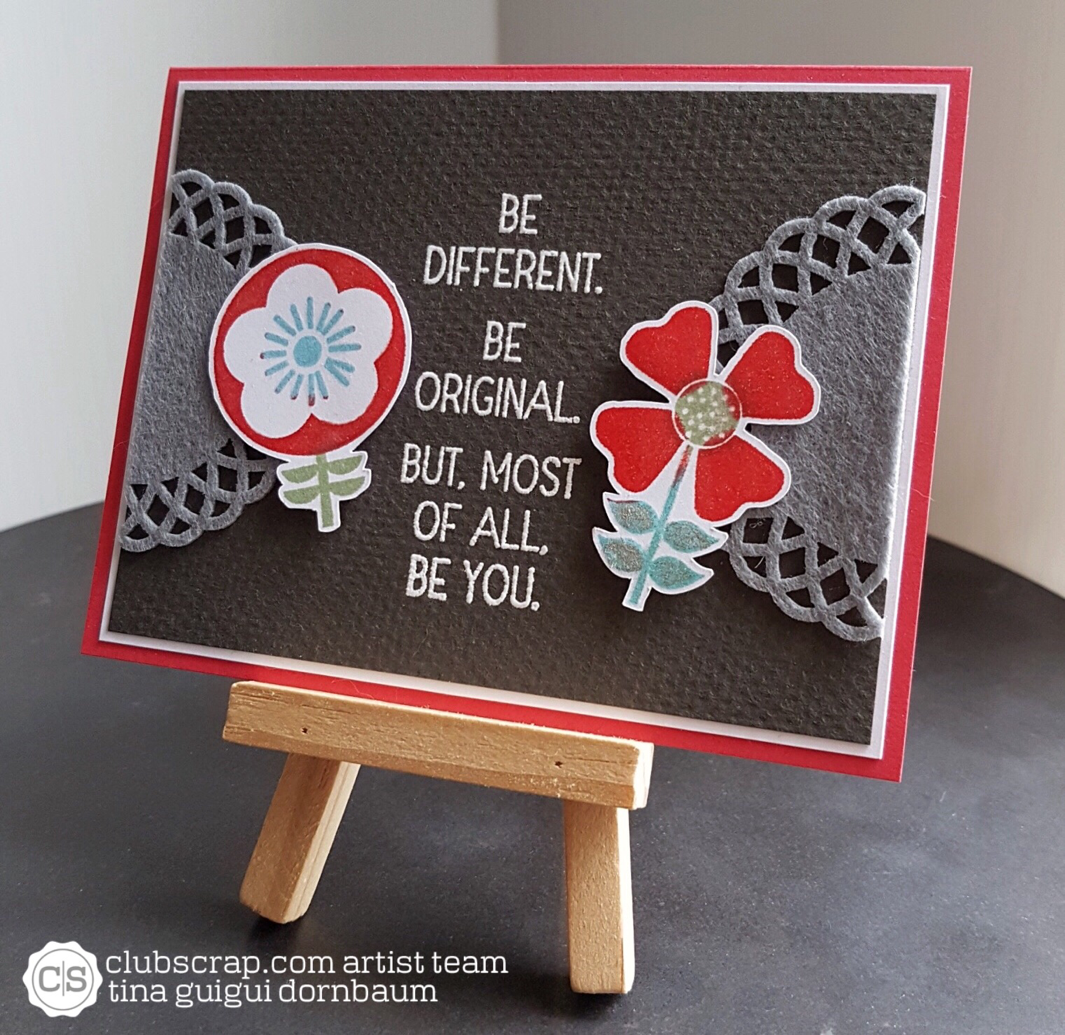
For this card the base of the card is plain cardstock trimmed to 8 1/2" x 5 1/2", then folded in half. I trimmed a panel 3 7/8" x 5 1/8" and matted it with white cardstock 4" x 5 1/4" and adhered to front of card. I cut the felt doily in half and adhered the half on the left and right side. I heat embossed in white the sentiment. I stamped two flowers on a post it to create a mask so I could stamp sections using different colors. I had to use my Misti for this. I trimmed them out with my scanncut and adhered it to the pop up.


Finished card measures 41/4” x 5 1/2”

For this card I used plain cardstock for the base of my card. The front panel is from the patterned paper trimmed to 3 7/8” x 5 1/8”. I stamped the image of the bird with Club Scrap Carnation ink. I stamped the sentiment in India Black ink. I matted the panel and adhered to the front of the card.


Thanks for stopping by. To continue the hop your next stop is Julie's Blog

Thursday, October 19, 2017

Club Scrap Orchard Kit

Hi Everyone,
Today I want to show you a DIY Background using Club Scrap Orchard Kit and Oxide Inks. The Orchard Kit is a stunning kit and wonderful for anything Autumn.

Finished card measures 4 1/4" x 5 1/2" folded

On white cardstock trim white Cardstock to 3 7/8" x  5 1/8". Add Oxide Inks to Craft mat in colours of your choice. Spray water to the ink to activate it. Start dabbing the paper to the ink. Heat with gun and repeat dabbing until you get your desired effect. I sprayed water in between directly to the water to get a splashed effect. Let dry. Once dry stamp images from the Orchard stamps and have fun. Below if the result. 


Matte the background to Cardstock. Wrap the paper fibre around the panel 3 times. Adhere panel to front of card. Add an image to the bottle cap embellishment and adhere to card using a strong medium. 


Thanks for stopping by. 

Tuesday, October 17, 2017

Elizabeth Craft Designs October Artist Team Challenge Think Christmas

Hi Everyone,
Welcome back to the Elizabeth Craft Designs Artist Team Challenge. Every month the Artist Team is challenged with a theme to showcase the fabulous product from Elizabeth Craft Designs. This month the challenge is Think Christmas.

There is a chance for you to win a $20 gift card. Visit the Elizabeth Craft Designs Blog. Answer this question What are your favorite projects to create during the Christmas season? by leaving a comment on the Elizabeth Craft Designs Blog. 3 lucky winners will be chosen in a random drawing.


Finished card measures 4 1/4” x 5 1/2” folded. Below you will find the steps to replicate this card.


  • Base of card trim white Soft Finish Cardstock 5 1/2" x 8 1/2", fold in half.
  • For a background trim white Soft Finish Cardstock to 4" x 5 1/4". Ink the paper with Oxide Ink in colors to create a wintery evening scene. Spray water onto the paper to create a snowlike effect. Let dry then adhere to base of card using 3mm Clear Double Sided Adhesive.
  • Diecut Adventure Edges on white Soft Finish Cardstock to create the snow banks.
  • Stamp sentiment with black ink on the diecut Adventure Edge top piece from the Winter Sentiments Clear Stamps. Adhere to the bottom of card using foam tape.
  • On white Soft Finish Cardstock stamp using Memento ink the images from the Snowman and Gifts set and Holiday Trees & Ornaments set. I coloured using Promarkers. After colouring I used the Snowman and Gifts and Holiday Trees & Ornaments matching dies. Adhere the images to the base of card using 3mm Clear Double Sided Adhesive.


Tag


  • Diecut Labels 1 with white Soft Finish Cardstock. While the tag is still in the die ink with Oxide Inks to create your background.
  • Stamp images from the Snowman and Gifts set and Holiday Trees & Ornaments set (the snowflakes) with blue ink and white ink.
  • Stamp Winter Sentiments Clear Stamps in black ink.
  • Stamp the image from the Snowman and Gifts set. Color with Alcohol markers. Diecut with the Snowman and Gifts matching dies. Adhere to tag using foam tape.
Thanks for stopping by. Below is a list of Products Used for your easy convenience.


Elizabeth Craft Designs Product Used


Other Product Used

Promarkers
Oxide Inks
Memento Ink
Black Ink
Foam Tape

Tuesday, October 3, 2017

Club Scrap Scandinavia Kit and Case This Sketch 241

Hi Everyone,
Can you believe October is here. With a new month comes a new kit from Club Scrap. Scandinavia Kit. I used the Digital Kit with Case This Sketch #241.

Here is the Sketch


Finished card measures 4 1/4" x 5 1/2" folded


The base of the card is white cardstock from Paris Flea Market. I printed the digital designs on white cardstock. I trimmed the cut-a-part and adhered it diagonally. Using my scanncut I trimmed the flower and adhered to the front of the card.


Thanks for stopping by. Be sure to come back to see more projects using the Scandinavia Kit.