Sunday, September 30, 2018

Santa is Watching Shaker Card

Hi Everyone, 
I have a process video to share with you for a Holiday Shaker Card. This card is showcasing the fun Stitched Scallop Collage Die, the Never Ending Rectangles Die, Sparkling Clear Solid Confetti Mix and the Photoplay Here Comes Santa from Kat Scrappiness. You can view the video below or open it in YouTube.


Below is a link to all the products used. To receive 10% off your order at Kat Scrappiness used code: TINA10 at checkout. Thanks for stopping by and have a wonderful day!

Products Used:

Saturday, September 29, 2018

National Coffee Day Blog Hop September 2018 With Kat Scrappiness

Hi Everyone, today it's National Coffee Day Blog Hop! Kat Scrappiness is a Super Sponsor so hop along with us at Kat Scrappiness Blog and you can win one of two $25 Gift Cards to shop at katscrappiness.com.


Below you will find the steps to replicate this card.


Step 1 - Trim Ivory Cardstock 8 1/2" x 5 1/2", score at 4 1/4" and fold in half for a vertical side fold card. (A2)

Step 2 - Place Honeybee Coffee Lovers Background (Coffee Rings) to the lower half of the front card and ink with Distress Oxide Walnut Stain. Spray some water and dab it to create more realistic stains.

Step 3 - Diecut Got Coffee base using Sand cardstock, the lid in brown and the coffee warmer in ivory. Stamp Lets Get Caffeinated sentiment stamp to the bottom of the coffee cup solid piece. Assemble the Coffee using collage medium. Before adhering the coffee warmer apply baker's twine 3 times and tie in a bow. Adhere the coffee to the front of card using scor tape.

Step 4 - Stamp Lets Get Caffeinated the coffee beans above the coffee to look like steam. 


I hope you have enjoyed this card. Remember to go here for a chance to win a $25 gift certificate. To receive 10% off your order use code TINA10 at checkout. Below are links to all the products used. Thank you for stopping by and have s wonderful day. 

Products Used:

Tuesday, September 18, 2018

Elizabeth Crafts Designs September Challenge Classic Christmas

Hi Everyone,
Today is the Challenge for Elizabeth Craft Designs. The challenge this month is Classic Christmas. Things that make traditions such as snowflakes, Christmas trees, roasting marshmellows, etc. There is a wonderful assortment from the new release by Joset Designs to help you with Holiday/Christmas classics. I used the gorgeous Snowflake Border die.

Before we get started for a chance to win a $20 gift certificate answer this question. What Elizabeth Craft Designs die or stamp set would you select if making a Christmas card? Go here to answer the question in the comments section. Below you will find the steps to replicate this card.


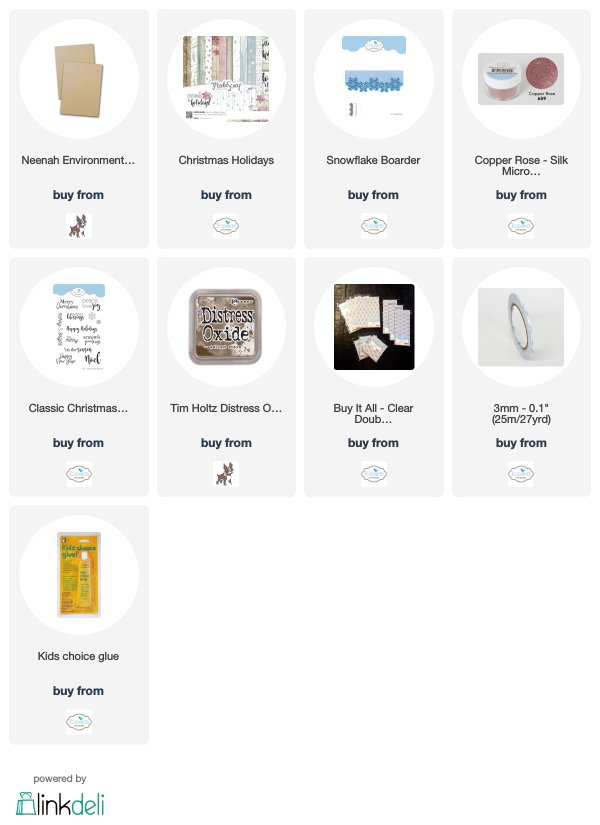
Step 1 - Trim Kraft Cardstock to 8 1/2" x 5 1/2", score at 4 1/4" and fold in half for a horizontal side fold card. (A2)

Step 2 - Trim ModaScrap Christmas Holidays Patterned Paper to 4 1/4" x 5 1/2" and adhere to front of card using 3mm Clear Double Sided Adhesive Tape.

Step 3 - On the card front from the bottom add 1 1/2" of Clear Double Sided Adhesive Tape. Diecut Snowflake Border solid die to the bottom front of card. Carefully remove the release sheet and sprinkle Silk Microfine Glitter Rose Gold. Remove excess with a brush and carefully using your fingertip in a circular motion to bring out the shine and set the glitter.

Step 4 - Trim ModaScrap Christmas Holidays Patterned Paper to 2 1/4" x 5 1/2". Diecut Snowflake Border pattern die to the bottom of the trimmed paper. Adhere to the bottom front of card carefully aligning the bottom edges using Kids Choice Glue around the bottom part and 3mm Clear Double Sided adhesive Tape to the upper top and sides.

Step 5 - Stamp Classic Christmas Sentiments Clear Stamp to the top left side of the bottom paper using Distress Oxide Ink Walnut Stain (or any ink medium of your choice).


You can use the diecut pieces to use inside your card or keep them for a shaker card. Below is a link to all the products used. Thanks for stopping by and have a wonderful day!

Products Used: