
Welcome back to another Love Themed Card. Before we get started I would like to remind you that I have a Blog Giveaway. Follow my blog for a chance to win this awesome die from Elizabeth Craft Designs. Lace Corner Die. The deadline has been extended to Friday January 26. The winner will be announced on Saturday January 27.
Lace Corner Die

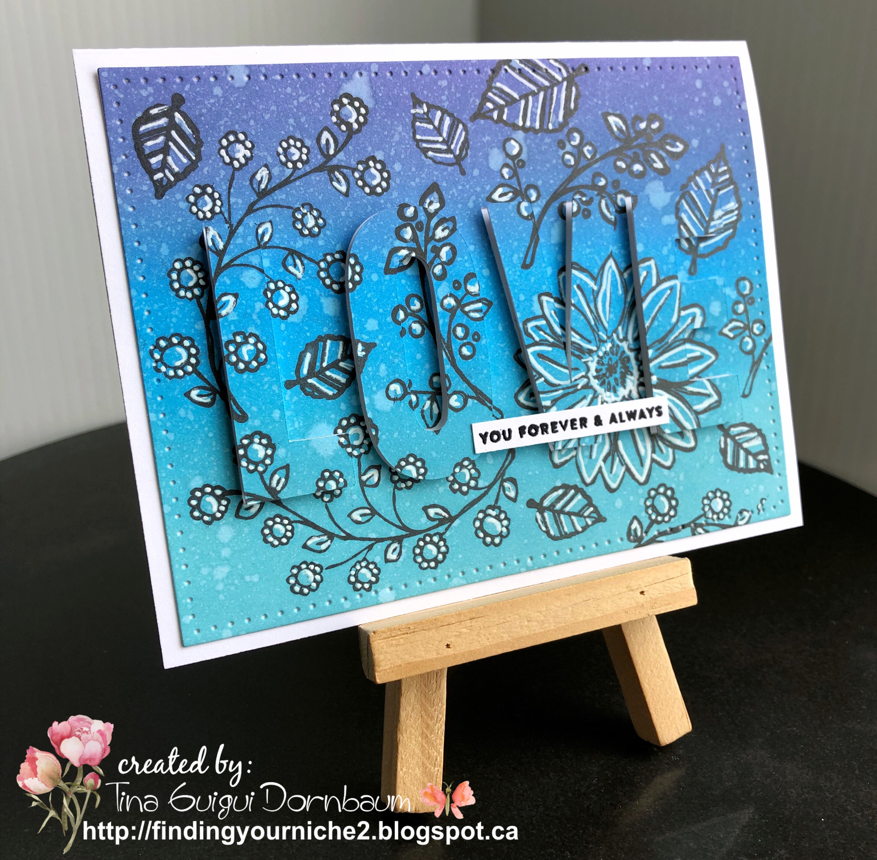
My card below was inspired by large alphabet dies to create an Eclipse Card. Unfortunately I don't have them but I do have a ScanNCut machine. Not only does this machine scan and cut but it takes the fonts you have on your computer and with a software such as Sure Cuts A Lot it is able to convert the fonts into cutable files. How awesome is that. Below you will find the easy steps to replicate this card. The products I used will be listed at the end of this post.

- Step 1 - Trim White Soft Finish Cardstock to 5 1/2" x 8 1/2", fold in half for a Horizontal Fold Card. Folded card measures 4 1/4" x 5 1/2".
- Step 2 - Trim White Soft Finish Cardstock to 4 1/4" x 5 1/2". Apply ink with an ink blending tool using Distress Oxide Inks starting from the bottom in the lightest color and working upward to the darkest color. I used Broken China, Salty Ocean, Faded Jeans and Wilted Violet. Once the inking has been applied spray some water to create a droplet effect. Let dry.
- Step 3 - Using a Pigment Ink stamp Blossom Time Clear Stamps all over the background. I used Versafine Onyx Black. Once you have fully covered the background take a White Uniball Signo Broad Pen and color inside the lines. See below photo for visual.

- Step 4 - Diecut the background using Stitched Rectangles.
- Step 5 - If you have the Alphabet Dies you can diecut the word LOVE. I used the ScanNCut to cut out the word LOVE. Using Sure Cuts A Lot I centered the word LOVE using the font Swis721 BlkCn BT. I exported the file to fcm file format and transfered the file on a USB key. Before I did my final cut I tested it out on a scrap piece of cardstock to make sure my placement was correct. Luckily I only needed to do this one time. Using 3mm Clear Double Sided Adhesive Tape I adhered the background to the center front of the card. I adhered the center of the letter O directly to the background. For the rest of the pieces I used foam tape to adhere the Letters.
- Step 6 - Stamp mini sentiment with an Embossing Ink on White Soft Finish Cardstock. Sprinkle Black Embossing Powder and heat set it with a heat tool. Trim the sentiment and adhere to the card using Multi Medium Glue.


This card is versatile and can be used for any occasion by simply changing the stamped images for your background, changing the colors and creating different words. For example you can use pink, red and orange for the inked background with balloon stamped images and the cut out word can be HAPPY with a mini sentiment Birthday.
Below you will find links and a list of all products used for your easy convenience. Thank you for stopping by.
Elizabeth Craft Designs Product Used

Other Products Used
ScanNCut (Font Swis721 BlkCn BT)
Heat Gun
White Uni-ball Signo Blend Pen
Distress Oxide Inks (Broken China, Salty Ocean, Faded Jeans & Wilted Violet)
Ink Blending Tool
VersaMark Embossing Ink
Ranger Black Embossing Powder
Multi Medium Matte
Tina your card is absolutely stunning! Love the colors, design and lifted sentiment!
ReplyDelete